In today's exercise, we will convert a text based program into one that uses a GUI. The application we will change models a light which is connected to two switches and has a master circuit breaker. We will use buttons in our application to implement the switches and the circuit breaker.
The program that we will be converting is contained in the files Light.java and LightDemo.java. As in the last program, we have split the code into the model and the interface code. Lets take a look at the code for Light.java and see how it models the problem.
We see that each light object will have four private attributes. The state of each switch (including the breaker) and a variable we will use to determine if the light is on when the breaker is on too. We use boolean variables for each of these. For the switches, true represents the up position. For the breaker, true represents that the breaker is connected. For the light itself, true represents that the light is on.
The constructor initializes all our boolean variables to be false.
We have four accessors:
Three of the accessors just return the value of a private variable. The state() accessor, on the other hand, is a combination of the values of two of the attributes.
We have three mutators, one for the circuit breaker and two for the switches.
We also have a reset() method that sets all the private variables to false.
We override the toString() method to provide a more useful print representation of the light object. Notice that it uses the state() method to determine if the light is on or off.
As is usual in a GUI, one of the first tasks is to decide on the layout. This time however, we want to consider using some new components. In particular, we want to use components that are event sources (generate events) that our code will respond to. The prototypical component that generates an event is a button.
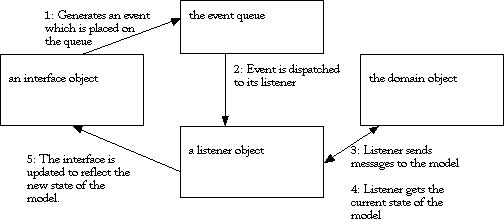
We need to have a better idea of what goes on when an event is generated. The following picture shows the order that actions occur:
So for example, we may have a JButton in our interface. When the user presses the button, an event is generated and placed on a queue. Events are taken off of the queue from oldest to newest. Each event must be registered with one or more listeners. A listener implements a specific interface which allows them to be notified of an event. In response to the event, the listener may send messages to the object which is the problem domain. It may then use accessors to determine the state of the domain object. The final step is to make any required changes in the interface such as changing labels, pictures, or the visibility of components.
To listen for events generated by a button our GUI will need to implement the ActionListener interface. This requires us to implement the method:
public void actionPerformed(ActionEvent event)
We will see an example of this later in the lab.
If you look in the documentation for the package java.awt.event, you will see that there are a number of different listener interfaces. Some of them are: WindowListener - for listening to window events, MouseListener - for listening to events generated by a mouse, KeyListener - for listening for key press events, and TextListener - for listening to text changed events.
We can create a button with the following code:
JButton aButton = new JButton("go");
This will create a button with the text "go". We can then add the button to our interface. It will show up, but if we press the button, nothing appears to happen. In fact, we did generate an event which was placed on the event queue. The problem is that when the event was handled there were no listeners that were registered for that event, so nothing happened. The missing step was that we needed to use the addActionListener() method to register a listener for the events generated by the button. For example:
aButton.addActionListener(aListener);
where aListener is any object that implements the ActionListener interface. It is very common in Java to make the GUI object itself the listener, in which case we would have:
aButton.addActionListener(this);
Another event source that might be useful to use is the JTextField. Whenever the user types enter in that field, an event will be generated.
We need to decide how our interface will look. We certainly would like to have a button (or some other event source) for the switches. It will be nice to also have a label for each of the switches telling what its current state is. Finally, it would be nice to have some graphical representation of the light itself. Putting it all together, here is one possible design:

To implement this design we will use two panels. One will be specialized to draw the light bulb similar to what we did in the last GUI Interlude. We will place this in the center position of our application's content pane.
The other panel will use a 2 by 3 GridLayout and will hold the buttons and the labels. We will place it in the south position of our application's content pane.
When we have buttons in a GUI, there may be occasions where it is not appropriate for them to be active. For example, we might have a vending machine where it is not legal to press a button until enough change has been placed in the machine. Each possible configuration of buttons enabled/disabled will be a possible state of our interface. Any time a button is pressed, we may transition from one state to another.
In our case, we will make the decision to hide the switch 1 and switch 2 unless the breaker is on. This leads to the following transition diagram. The transitions (arrows) are labeled by the event that causes the transition to occur. The states are given appropriate names as well.
We will eventually create a method which corresponds to each state in our transition diagram. The method will guarantee that the state of the interface is correct.
There are a number of tasks that we need to complete for the GUI. We will take this in three steps:
There is a skeleton for the class LightGUI.java already in place. Take a moment to look at it and then add it to your project. It has code in place to draw the base of the light bulb.
We would like to be able have our picture change depending on if the light is on or off. We already have a private variable in the LightDrawer class called drawOn. If this is true, we want to draw our bulb with a filled yellow interior.
Since the state of the light will change as we run the code, we need to provide a method to inform the LightDrawer of the change in status. Add a method
public void makeLightOn(boolean state)
which will update the private variable.
The other thing we want to do is to add the code to draw the light bulb. The algorithm you should use is
Complete and test this code using
myPicture.makeLightOn(true);
and
myPicture.makeLightOn(true);
just after you create the new LightDrawer.
We can create all of the interface components and verify that the interface is how we desire it to be before we make the components functional.
In the appropriate place declare
and then add them and myPicture into the interface.
Don't forget to set the layout for the two JPanel's.
Don't forget to change the argument of the setContentPane() to be the panel you created.
Keep working on this code until all of the components are visible and in the appropriate places.
At this point, if we were to press a button nothing will happen. We need to add in the code for handling the action events generated by a button press.
The first thing that we will do is to create a method that will set the labels appropriately for the state of the Light. Create a method with the following prototype inside the LightGUI class:
private void setLabels()
It should query the Light object to find out its state with expressions like
myLight.stateSwitchOne() == true
and then use setText() on its label to make them correspond.
We would like to have two methods that set the switch buttons and labels to either be visible or not visible. Create code for these two methods in inside the LightGUI class. You can use the setVisible() method on the labels and buttons. For example, if you had a button referenced by the variable aBigButton you could make it invisible by
aBigButton.setVisible(false);
We need to do something appropriate when an event is passed on to us. The first thing that we want to do is to be able to determine which one of our buttons generated the event. Assuming that we only get events from our buttons, we can use the following line of code
JButton eventButton = (JButton) eventSource;
to get a reference to the button that generated the event. We can then use an condition like
myButton.equals(eventButton)
where myButton is replaced by one of the private buttons you created earlier to determine the source of the event.
You will then need to send an appropriate message to the Light object. To get you started here is some sample code:
   if(eventButton.equals(switch1Button))
      myLight.flipSwitchOne();
Do similar things for each of the other two buttons. One difference is that if our event is to flip the breaker, we need to call either breakerOnState() or breakerOffState() depending on the resulting state of the breaker.
To finish it off, we need to change the labels and repaint the light bulb picture. The following three lines of code will do those tasks:
   setLabels();
   myPicture.makeLightOn(myLight.state());
   myPicture.repaint();
The repaint() method is inherited from JPanel and will call the paintComponent() method we defined earlier.
Test your code thoroughly and fix any bugs that you find.
Event, Event Queue, Listener, Button, Transition Diagram, State, addActionListener(),actionPerformed(), repaint().
A hard copy of your final version of LightGUI.java.
Back to This Lab's Table of Contents