In today's exercise, we will convert a text based program into one that uses a GUI. The application we will change simulates a random walk in two dimensions. There is a famous physics thought experiment that goes like this:
Suppose you have a drunk person that is standing next to a lamp post. He is very unsteady, but decides to head home. Fortunately, he is constrained to walk along the street (one dimension). Unfortunately, he has an equal probability of going forwards or backwards.
Given this situation, a physicist will want to know the answers to questions like:
One approach to this kind of problem is to look for a mathematical solution. This is fine for a theoretician, but what about an experimentalist? Their approach would be to create an experiment and test the formulas that the theoretician comes up with. Now to actually run such an experiment would take time and who knows what governmental agencies would complain about the use of a human (let alone a drunk human) in our experiment. Fortunately, as computer scientists, we can write a simple program and save ourselves from having to deal with actual people.
In today's code, we will allow our person more freedom than in the stated problem. Instead of being on a road, you can imagine our person as standing next to a tree in the middle of a field. Now he can take a step in any direction. This results in a two dimensional random walk.
The program that we will be converting is contained in the files RandomWalker.java and RandomDemo.java. Lets take a look at these two classes and see how they solve the problem.
We see that this class has five attributes:
These attributes record the position in the 2-D plane of the walker, the maximum change (extent) in x and y for a single step, and the number of steps taken so far.
The constructor forces us to initialize the extent and sets the other values to zero.
We have an accessor for each of the attributes. The ones we will be concerned with are:
The one mutator is
which causes the walker to take a step in a random direction. The method Math.random() is used to generate a random value between 0.0 and 1.0. We convert that into a random value between -1.0 and 1.0 and then multiply by the appropriate extent.
It uses the following algorithm to generate a printout of the positions visited by a random 2-D walk:
0. Read in the maximum number of steps to take.
   1. Read in the maximum change in x and y per step.
   2. Read in the maximum value for x and y.
   3. Create a new RandomWalker.
   4. Print the walker (original position).
   5. Loop at most maxSteps times
      a. Take a step.
      b. Break out of the loop if out of bounds.
      c. Print the walker.
Take a moment and make sure that you understand how this solves the problem.
Make a project named RandomWalk and add RandomDemo.java, RandomWalker.java and the ann package to it. Compile and run the code with some different input values. Notice that even if you give the code the same input values, the output will be different.
Why do we have two classes instead of just one? We could have solved the problem with just a single class holding just the main function. The answer to why goes back to the design. As the original code was being developed, the author considered what the objects in the simulation were. The obvious one is the random walker. The not so obvious one is the simulation itself. Once we have the objects in the simulation, we need to know what the responsibilities of each object are.
Responsibilities of walker:
Responsibilities of the simulation:
Note that this is not the only possible design. For example, we could have put the responsibility for knowing the boundaries on the walker.
One benefit of the split in responsibilities we have is that all of the interface responsibilities are localized in one class. This kind of a split is very common in OOP design. It is typical of a two layer design which has a problem domain and an interface. Notice that our current design is not a pure design, since we have mixed the interface (getting input from user and doing output) with the simulation (knowing how many steps one can take, etc.) The benefit of this kind of design is that we can change the interface without having to change the domain.
As in the last interlude, we need to decide what our GUI should look like. For the input values, we will use a JOptionPane. The output, however, is another matter. We could print all the data values, but that would not be very informative. Instead, we would like to have some kind of graphical representation. Fortunately, we can draw pictures on components in Java.
In our design we would like to make sure that we have:
One possible design would look like this.
There is still a lot of flexibility in this design. Should the text be in a JTextArea or four JLabels? In fact, we will choose to do neither and draw the string information directly onto the graphics area.
We can use the following components to implement this design.
|
Component |
Type |
Name |
|---|---|---|
|
input maximum number of steps |
JOptionPane |
|
|
input maximum change in x |
JOptionPane |
|
|
input maximum change in y |
JOptionPane |
|
|
graphics drawing area |
WalkDisplay |
myPicture |
|
the whole thing |
JApplet |
We will follow tradition and create a new class for the purpose of drawing. It will extend JPanel and therefore can be drawn on. This class will have a constructor and it will have one method which must be
public void paintComponent(Graphics pen){
which will do all the drawing. The method paintComponent() will be called anytime the window needs to be redrawn. For example, suppose that we change the size of our application. The application will ask each of its components to redraw themselves. This method is how it will be accomplished.
To do the painting, we will send messages to the pen that is passed into us. Some of the common methods are:
The fill methods will use the current pen color to fill the specified shape. Notice that all of the coordinates are integer values. This will have consequences for our program.
Another thing to keep in mind is that the origin of the coordinate system is in the upper left hand corner. X values increase going to the right. Y values increase going down.
For our design, we will use the fillOval() method to plot our points and the drawString() method to display the text information.
The first thing that we want to do is to make a copy of RandomDemo.java and call it RandomGUI.java. We will make all our changes in RandomGUI.java.
We need to import the appropriate packages.
   import java.awt.*;
   import javax.swing.*;
   import ann.gui.*;
We need to change the name of the class to RandomGUI and make it extend CloseableFrame which is a convenience class in ann.gui. It is for creating an application with a frame that appropriately handles a window close event.
Once we have a RandomGUI class, we should provide a default-value constructor. Since our RandomGUI class has no instance variables, the only thing its constructor must do is make certain that the constructor of its superclass (i.e., CloseableFrame) gets invoked. To do this, we can use the super() method, so add the following code near the beginning of the class:
  public RandomGUI()
  {
     super();
  }
We will use a helper class to do the actual work of drawing. The first thing to do is to create the new class. At the very end of the file RandomGUI.java after the class RandomGUI add in the following stub for a class:
class WalkDisplay extends JPanel
{
}
Inside this class let's create stubs for the constructor and the paintComponent() methods:
     public WalkDisplay()
     {
     }


     public void paintComponent(Graphics pen)
     {
     }
What are the responsibilities of the WalkDisplay class?
One possibility is that our main program will create the random walker and then call step() an appropriate number of times. The points visited would be stored in an array. This array could then be passed to the WalkDisplay class. We will take a different approach. The main function will create the random walker and then will pass that to the WalkDisplay when it is constructed. This results in new responsibilities for the WalkDisplay class.
After we have decided on the responsibilities of WalkDisplay, we need to record the responsibilities of the main() method:
The first four are new responsibilities related to being a GUI.
Just before the definition of main(), declare three static constants.
These will be the width of the area we will draw in, the height of the area we will plot points in, and the height of the area we will draw our message in. Since we had four lines to display in our design and each line should be about 20 units high, this should give us enough space.
Just after the main(){ put in these two lines:
	RandomGUI myGUI = new RandomGUI();
	myGUI.setSize(WIDTH, HEIGHT+MESS_HEIGHT);
Use JOptionPane to get maxSteps, maxXChange, and maxYChange as we have done in the past.
We don't need to get maxX and maxY because we will use the constants WIDTH and HEIGHT instead.
This should be the same as in RandomDemo.java.
Before we can do this, we need to know what information to send to the display. Lets review the responsibilities of the WalkDisplay:
To satisfy 4, we need to send it the three constant values. To satisfy 5, we need to send it fred (our instance of RandomWalker.) To satisfy 6, we need to send it maxSteps.
Add the following line of code to main():
   WalkDisplay myPicture =
      new WalkDisplay(WIDTH, HEIGHT, MESS_HEIGHT, maxSteps, fred);
Then go and change the constructor for WalkDisplay to match. Don't forget to create attributes to store these values.
The final lines in main() should be:
   myGUI.setContentPane(myPicture);
   myGUI.setVisible(true);
Now we should be able to see our WalkDisplay.
You should compile your program. If you have syntactical errors, review the above steps and find your errors. Once it compiles, run the code. It should get three values and then display a gray rectangular window with the title RandomGUI. Continue when you have achieved this.
Since this is where most of the new material is, lets take it in steps. After each step, compile and fix any syntax or logic bugs.
Gray is an unappealing color. Lets make the background white.
We can use the setBackground() method. One can specify a color using RGB format, but we will use one of the predefined colors (black, blue, cyan, darkGray, gray, green, lightGray, magenta, orange, pink, red, white, yellow). Add the following line to the WalkDisplay constructor:
setBackground(Color.white);
To observe this change we need to add the following line to paintComponent().
super.paintComponent(pen);
We must do this because there are many things that need to be done to paint on our pane, including taking care of the background color. The super.paintComponent() ensures that they are done. (You'll see more precisely what this means when you cover the material on inheritence in chapter 11.)
We would like to display appropriate information on our pane. Lets make the color of our text blue. Add the following line to paintComponent() after the super call.
pen.setColor(Color.blue);
This sends a message to our pen to change its color to blue for any subsequent drawing.
To draw a string, we need to provide 3 arguments. The first is the string that we want to display. Then give the x and y value of the start of our string. The x value is the left edge of the first character. The y value is the baseline of the string. Something like the following should put a message in our window.
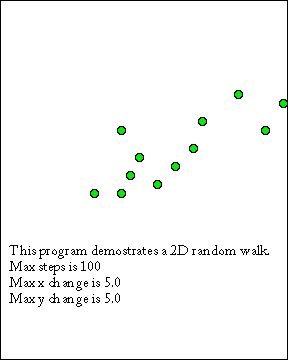
   pen.drawString("This program demonstrates a 2D random walk.",
                        0, myDrawAreaHeight + 20);
Using what's above as a pattern, send pen the necessary drawString() messages so that if the user enters the values 100, 5.0, and 5.0 for maxSteps, maxXChange, and maxYChange, then the following lines appear in our WalkDisplay:
  This program demonstrates a 2D random walk.
  Max steps is 100
  Max x change is 5.0
  Max y change is 5.0
Continuing in paintComponent(), change the color of the pen to green.
Next, send a reset() message to your walker. Since paintComponent() may be called more than once, we would like to start our walker over in the center each time.
Cut the loop from RandomGUI.main() and paste it into paintComponent(), changing variable names as necessary.
Since we would like our points to be in our drawing area, the bound on X (maxX in RandomDemo) will be half of myDrawAreaWidth. Similarly the bound on Y will be half of myDrawAreaHeight.
Make these changes and run the program. You should see a list of points on the console.
Now we need to take the values that are produced by the RandomWalker and plot them in our drawing area. Unfortunately, there are two problems we must resolve:
The following diagram shows these issues:
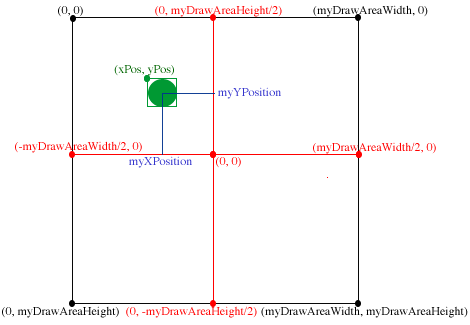
The black lines and coordinates show the coordinate system of our JPanel, and the red lines and coordinates show the coordinate system within which we wish to plot points. The green figures and coordinates show the x and y parameters as they are used by drawOval(), and the blue lines and coordinates show the x and y coordinates we are computing in our walker. While this sounds pretty complicated, it isn't as bad as it seems if we just take our time and proceed methodically.
To "translate" the black coordinate system into the red coordinate system, we must effectively shift the origin from the upper left corner to the center of the JPanel.. To "translate" the green coordinates into the blue coordinates, we must subtract the radius of the oval we wish to plot from the x and y coordinates of the position where we wish our oval to appear.
Let's begin by converting our double x-coordinate to an int:
int xPos = (int) Math.round(myWalker.xPosition());
Next, let's figure out how to translate an x-coordinate from the "black" coordinate system into the "red" coordinate system. Consider these three x-coordinate values from each system:
| Red System X-Coordinate | Corresponding Black System X-Coordinate |
|
-myDrawAreaWidth/2 |
0 |
|
0 |
myDrawAreaWidth/2 |
|
myDrawAreaWidth/2 |
myDrawAreaWidth |
From this, it should be evident that we need to add myDrawAreaWidth/2 to each of our x-coordinates to translate them from the "red" system to the "black" system.
Once we have translated our coordinate system, we need to subtract half of the size of the oval to translate a "green" x-coordinate into a "blue" x-coordinate. Putting it all together gives us:
xPos = myDrawAreaWidth/2 + xPos - OVALSIZE/2;
where OVALSIZE is a constant we must define. (Choose a small value like 2 or 3 for now.)
Do a similar analysis and compute the appropriate yPos.
(Hint: Do a full analysis for y-coordinates like we did for x-coordinates. The translation of a y-coordinate is different from that of an x-coordinate because unlike x-coordinates, a y-coordinate in our "black" coordinate system, increases as you move from top to bottom, but a y-coordinate decreases as you move from top to bottom in our "red" coordinate system.)
The final step is to actually plot the point using drawOval(). The last statement in the loop should be
pen.fillOval(xPos, yPos, OVALSIZE, OVALSIZE);
Test the code and do any needed debugging.
Add the code to "trace the walk" by drawing a line between each successive pair of ovals.
Random walk, Responsibility, Two layer design, Problem domain, Graphics, paintComponent(), drawOval(), drawString().
Turn in to your instructor a hard copy of your final version of RandomGUI.java.
Don't forget to clean up. Among other tasks you may need to save your work to a floppy, remove your originals from the hard drive, etc.
Back to This Lab's Table of Contents