 in two dimensions. This is based on a
physics thought experiment:
in two dimensions. This is based on a
physics thought experiment:In this lab exercise, you will translate a text based program into a drivers that use GUI widgets; a follow-up lab will ask you to write a second GUI driver. In the end, you will have both a command-line based program and two GUI programs that do (nearly) the same things.
One of the things to watch is how little the computation code changes.
The application for this lab simulates a random
walk in two dimensions. This is based on a
physics thought experiment:
Suppose you have a drunk person that is standing next to a lamp post. He is very unsteady, but decides to head home. He is constrained to walk along the street (one dimension), and he has an equal probability of going forwards or backwards.
Given this situation, a physicist will want to know the answers to questions like:
Physicists can derive theoretical formulas that answer the questions. They may also want to perform experiments to verify the formulas. We'll leave the theory to the theoreticians, but we can perform the experiment as a simulation in a computer program. This may give a physicist more insight into what happens. (And a simulation saves us from the hassle and moral problems of trying to run real-world experiments with human subjects.)
The program you work on for this lab will allow the simulated person more freedom than in the stated problem. Instead of being on a road, imagine the person as standing next to a tree in the middle of a field, and he can take a step in any of four directions. This results in a two dimensional random walk.
We're at a point where you won't be seeing too many new concepts. Not language concepts. It's all about the libraries that Java provides. It's all about the concepts you've already seen.
Consequently, much of this lab exercise is about the libraries you need to solve this physics simulation. There are two useful resources you'll find helpful:
As for the language concepts (e.g., variable declarations, object allocation/creation, inheritance, etc.), look back at the previous lab exercises for patterns and example code.
Remember: good computer programmers know very few things; they know where to look them up.
Be careful with the files you create. Some of them have an
a suffix, others don't!
Do this...
edu.institution.username.hotj.gui03
Exercise Questions/gui03a.txt.Design/gui03a.txt.The code you're given uses the model-view-controller
pattern (MVC) to organize the classes.
The MVC pattern makes a sharp distinction among the classes needed
for a program; some classes are used for the data model,
others are used for the program control (i.e., the
main() driver), and others are used for the user's
view.
The great thing about a pattern like this is that some changes are very easy to make. In particular with the MVC pattern, you can make changes to the view or even create completely brand new views without changing the model at all.
RandomWalkerAn instance of this class simulates a random walker. The constructor requires two values:
The size of the field is actually half of the whole
size. If you pass in 5.0 for this size, then the field
will go from -5.0 to +5.0.
Look over the accessors to see what kind of information you can get from a walker.
Internally, the majority of the work is done by the
walk(int) and takeStep() methods. You can
look at the code to see how this is done, but the whole point of
the MVC pattern is that you don't really need to know
these details. The class promises that the steps will be created
for you, and the accessors are more than enough for you to build a
view and controller to use a RandomWalker object.
RandomWalkerCLIDriverThe view and controller are combined into one class for this particular command-line interface.
The main method of this driver has two main steps:
Part of displaying the walker entails actually creating the walker created from the data read in.
Take a moment to read through the driver to see how it implements these steps. Any controler will have to do these same steps; how they do it will vary.
One of the first steps in writing a GUI program is to determine what it looks like. We will focus in this lab exercise on generating a good view of the walk itself. We'll improve the input aspect of the driver in the follow-up lab.
Here's an example of a nearly finished product for this lab exercise:
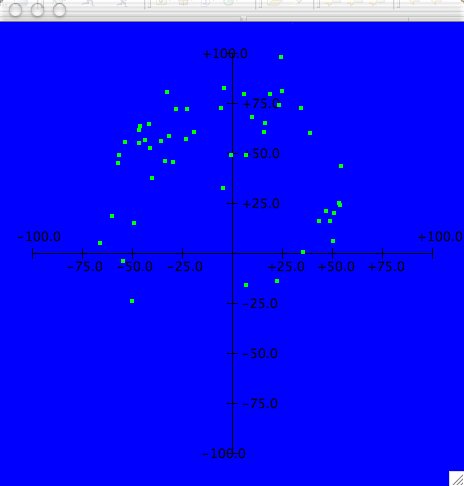
This is how the finished product looks on my Macintosh. (Incidentally, this was 50 steps, an extent of length 20, and field size of 100---values you may find useful later on.)
Do this...
Create a RandomWalkerGUIDriver
driver class.
This class will actually be quite similar to
RandomWalkerCLIDriver because you'll use
JOptionPanes to read in the input, and
JOptionPanes lead to drivers very similar to CLI
drivers. JOptionPanes are actually a pretty bad way to
get input, but as mentioned in the previous section, we'll worry
about GUI input in the follow-up lab.
The GUI driver has the same attributes as the CLI driver.
Do this...
Declare the same instance variables in
RandomWalkerGUIDriver that you already have in
RandomWalkerCLIDriver.
Making a walker is no different.
Do this...
Copy RandomWalkerCLIDriver#makeWalker() into the
RandomWalkerGUIDriver class.
The steps to read in data is the same.
Do this...
Copy RandomWalkerCLIDriver#readData() into the
RandomWalkerGUIDriver class.
Actually reading the data and displaying the walk will be different.
Do this...
Write stubs for these methods:
RandomWalkerGUIDriver#readNumberOfSteps()RandomWalkerGUIDriver#readExtent()RandomWalkerGUIDriver#readSizeOfField()RandomWalkerGUIDriver#displayWalk()These methods should have the same signatures as their
counterparts in RandomWalkerCLIDriver. Do
not copy them over from
RandomWalkerCLIDriver!
Now the main(String[]) method can be copied
over.
Do this...
Copy RandomWalkerCLIDriver#main(String[]) into
RandomWalkerGUIDriver.
theScreen.cli to be
gui.gui is of type
RandomWalkerGUIDriver.Do this...
You should be able to compile
your code and run both drivers. The
GUI driver won't do anything interesting.
Two warnings before we go on.
First, you may be tempted to use inheritance for the drivers---there are three common attributes; there are two common methods. However, the second GUI driver will not fit into these same molds. After you finish the second driver, then you can think about ways to use inheritance for the drivers.
Second, do not copy the process*() and
displayWalk() methods from the CLI driver into the GUI
driver. It's much, much better to create these methods from scratch
since they change so much.
The most significant thing about the methods I've asked you not to copy is that they deal with input and output. The way GUIs deal with input and output are very different than CLIs. In this first GUI driver, the main difference will be in what libraries you use. In the second GUI driver, you'll use completely different libraries and a completely different way of handling input and output.
Here's the algorithm for readNumberOfSteps():
Algorithm of RandomWalkerGUIDriver#readNumberOfSteps()
- Prompt for the number of steps.
- Read in
numberOfSteps(aString).- Set
myNumberOfStepsto be the integer value ofnumberOfSteps.
This algorithm was already implemented in
RandomWalkerCLIDriver#readNumberOfSteps(); that
version required theKeyboard and
theScreen; prompting was a separate statement from
reading.
For RandomWalkerGUIDriver, though, you can combine
a "prompt" and "read" step into one statement using
JOptionPanes, as you did in GUI #1.
Do this...
Write code for the first two steps of this algorithm in
RandomWalkerGUIDriver#readNumberOfSteps() using a
JOptionPane.
The last statement of this algorithm is actually the same in both drivers.
Do this...
Write the code for the last step of the algorithm.
This same approach can be used for the other two
read*() methods.
Do this...
Implement RandomWalkerGUIDriver#readExtent() and
RandomWalkerGUIDriver#readSizeOfField() to use
JOptionPanes to do the prompting and reading work. Use
the data conversion code from the CLI driver to convert the
Strings from the JOptionPanes.
Do this...
Run your GUI driver. Input should
come from JOptionPanes. You won't get any output
because RandomWalkerGUIDriver#displayWalk() is
empty.
WalkDisplayYou will now implement WalkDisplay to provide you
with a canvas for you to draw the random walk on. Picture drawing
in Java is done with the javax.swing.JPanel class;
WalkDisplay will (indirectly) inherit from this
class.
Do this...
Create a WalkDisplay
class which extends ann.gui.CartesianPanel.
The CartesianPanel class is part of the
ann library that comes with our textbook. The
CartesianPanel class draws the Cartesian axes for
Cartesian coordinates as seen in the picture above (i.e.,
everything but the green dots).
Normally, your subclass of JPanel will override
paintComponent(Graphics) like so:
public void paintComponent(Graphics pen) {
  super.paintComponent(pen);
  ...
}
This method is called every time the panel needs to be redrawn.
CartesianPanel#paintComponent(Graphics) is already
overridden like this; you will do it again in
WalkDisplay. In the end, this will mean that your
WalkDisplay#paintComponent(Graphics) will invoke
CartesianPanel#paintComponent(Graphics) which, in
turn, invokes JPanel#paintComponent(Graphics). This is
exactly what you want because each of these methods provides a
different behavior:
JPanel#paintComponent(Graphics) handles some
technical issues (mostly dealing with transparency) which you don't
want to manage.CartesianPanel#paintComponent(Graphics) draws the
Cartesian axes you see in the picture above.WalkDisplay#paintComponent(Graphics) will draw the
random walk.The rest of WalkDisplay#paintComponent(Graphics)
will be code that uses pen to do some
interesting drawing. You can send a variety of messages to the
pen object
Do this...
Read over the
API for the Graphics class. Check for these
methods in particular:
Graphics#setColor(Color)Graphics#setFont(Font)draw or
fillWarning!!! The x and
y coordinates for these Graphics methods
would perhaps be better named as column and
row. These x and y values
are not the same as the x and
y coordinates from a random walker!
The most important thing about screen
coordinates (as used by the Graphics class)
is that the origin (0, 0) is in the upper left hand
corner. The x values increase going to the right; y values
increase going down. Note that the y axis in screen coordinates is
"upside down"---it increases down the screen.
The first step is to figure out how we want the walk to look. To
begin with, you will start out with drawing a circle for each step
(as in the screenshot above.) While the Graphics class
does not provide a circle drawing method, we can use
Graphics#fillOval(int,int,int,int) since a circle is
just a special oval. Filling in the circle will allow us to see it
better.
Do this...
Override the definition of
CartesianPanel#paintComponent(Graphics) in
WalkDisplay.
@Override before the method declaration to
make sure you're overriding the right method.The paintComponent(Graphics) method must paint
everything---the entire walk. Before it can do that,
though, we need some data that the constructor should initialize:
the size of the field and the list of steps.
The first statement in your
WalkDisplay#WalkDisplay(double,List<Step>)
constructor will be a call to the superclass constructor:
CartesianPanel#CartesianPanel(double minX, double minY, double maxX, double maxY)
Helpful hint: When debugging later on, if the graph seems too small, look at the order of the arguments passed to the superclass's constructor!
Assume that the size of the field (i.e., the first parameter of the constructor) is positive; use it for the maximum values; use its negative value for the minimum values. Watch the order of those arguments!!!
You'll need to save the list of steps in your instance variable.
Do this...
mySteps of
type List<Step> in
WalkDisplay.double) and a List<Step>.mySteps.WalkDisplayYou're actually positioned now to finish the changes to
RandomWalkerGUIDriver. The algorithm is fairly
technical now (i.e., not particularly creative):
Algorithm of RandomWalkerGUIDriver#displayWalk()
- Let
outputViewbe a newJFrame.- Set the default close-operation of
outputViewto be "exit on close".- Let
walkerbe aRandomWalkerbased on my input data.- Let
stepsbe the steps created bywalker.- Let
walkDisplaybe a newWalkDisplayinitialized withmySizeOfFieldandsteps.- Add
walkDisplayto the content pane ofoutputView.- Set the size of
outputView.- Make
outputViewvisible.
Now to put the objects and operations in context:
Objects of RandomWalkerGUIDriver#displayWalk()Description Type Kind Name the output view JFramelocal outputView"exit on close" operation constant intconstant JFrame.EXIT_ON_CLOSEthe walker RandomWalkerlocal walkerthe steps from the walker List<Step>local stepsthe display of the walk WalkDisplaylocal walkDisplay
Operations of RandomWalkerGUIDriver#displayWalk()Description Predefined? Name Library create a new JFrameyes JFrame()constructorJFrameset the default close-operation yes setDefaultCloseOperation(int)JFramecreate a random walker yes makeWalker()RandomWalkerGUIDriveradd a widget to a JFrameyes add(aWidget)JFrameresize the JFrameto preferred sizes (i.e., "pack" it)yes pack()JFramemake a JFramevisibleyes setVisible(true)JFrame
Do this...
Implement RandomWalkerGUIDriver#displayWalk().
Turn back to the
WalkDisplay#paintComponent(Graphics) method.
This method starts by calling the superclass's version of this method. (You should have this coded already.)
Algorithm of WalkDisplay#paintComponent(Graphics)
- Receive
pen.- Invoke the superclass version of
paintComponent(Graphics)method withpen.- Set the background color of the panel.
- Change the color of
pento green.- For each
stepinmySteps:
- Draw
stepwithpen.
Check the java.awt.Color class for the color
green.
Operations of WalkDisplay#paintComponent(GraphicsDescription Predefined? Name Library receive penyes parameter passing built-in invoke the superclass version of the same method yes super.paintComponent(pen)built-in change the background color yes setBackground(Color)JPanelchange the color of the pen yes setColor(Color)Graphicsfor each step... yes foreach loop built-in draw the current step no drawStep(Graphics,Step)WalkDisplay
Do this...
Write a method stub for
WalkDisplay#drawStep(Graphics,Step). It doesn't return
anything.
Do this...
Implement WalkDisplay#paintComponent(Graphics). The
code should compile, and the GUI
driver should run to the point of
displaying a Cartesian coordinate system.
But no steps yet...
The minor problem with drawing circles is that you're only allowed to draw ovals. However, a circle is just an oval with the same width and height, so this really isn't a problem.
The real problem is that we have two coordinate systems: Cartesian x/y-coordinates and row/column screen-coordinates.
Graphics objects need column and
row integers.These two problems are fixed with two helper methods of the
CartesianPanel class. (See the list of operations
below.)
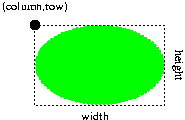
The last problem is picking where to plot the circle. Usually we
think about the center point (or even the two foci) of an oval. The
Graphics class requires us to provide it with the
upper-left "corner" of the oval. Actually, it's the
upper-level corner of the smallest rectangle that fits around the
oval as seen in the picture on the right. Since the x- and
y-coordinates of a step really indicate the center of the circle,
you'll have to compute the center point first in screen
coordinates. Then, if you subtract the radius from both of those
screen coordinates, you'll have the screen coordinates for the
corner of the circle.
Algorithm of WalkDisplay#drawStep(Graphics,Step)
- Receive
penandstep.- Let
centerColumnbe the column-equivalent of the x-coordinate ofstep.- Let
cornerColumnbecenterColumn-RADIUS.- Let
centerRowbe the row-equivalent of the y-coordinate ofstep.- Let
cornerRowbecenterRow-RADIUS.- Draw a filled circle at (
cornerColumn,cornerRow) of sizeDIAMETER.
Objects of WalkDisplay#drawStep(Graphics,Step)Description Type Kind Movement Name the drawing pen Graphicsvariable in penthe current step Stepvariable in stepthe column for the center of the circle intvariable local centerColumnthe column for the "corner" of the circle intvariable local cornerColumnthe row for the center of the circle intvariable local centerRowthe row for the "corner" of the circle intvariable local cornerRowthe radius of the circle intconstant class RADIUSthe diameter of the circle intconstant class DIAMETER
It's up to you to make sure that DIAMETER
is exactly twice as much as RADIUS. Best
option: use 2 * to
initialize RADIUSDIAMETER. Initialize RADIUS
with something small (i.e., less than 10); you can always change it
later.
Operations of WalkDisplay#drawStep(Graphics,Step)Description Predefined? Name Library receive penandstepyes parameter passing built-in get the x-coordinate of stepyes getX()Stepconvert x-coordinate to column coordinate yes xToColumn(double)CartesianPanelget the y-coordinate of stepyes getY()Stepconvert y-coordinate to row coordinate yes yToRow(double)CartesianPaneldraw a filled circle yes fillOval(int,int,int,int)Graphics
Keep in mind that your WalkDisplay is a
CartesianPanel. Everthing that
CartesianPanel declares is declared automatically in
WalkDisplay. So invoke the methods from
CartesianPanel directly.
Do this...
Implement WalkDisplay#drawStep(Graphics,Step).
Do this...
Now run the GUI driver to see the
results of your work!
Make two more changes to the code:
Do this...
Draw outlines for the step circles in a different color than the
circles' fill color.
This is a matter of adding some extra statements to
WalkDisplay#drawStep(Graphics,Step).
Do this...
Connect the steps of a walk with a line between consecutive
steps.
This one is a bit more involved. However you do it, it's best if you keep it separate from the loop that draws the steps themselves. Create a second loop before the existing loop.
This new loop could be a counting for loop; this
would allow you to refer to steps at indices
i and i-1 (for
example). If you want to use a foreach loop, you can use a
previous value to remember the previous step
(initially null); then draw a line between
previous and step.
That's it for this first GUI driver. GUI #3b asks you implement a second GUI with a more traditional GUI interface.
Cartesian coordinates, model-view-controller pattern, MVC, random walk, screen coordinates