In today's exercise, we will convert a text based program into one that uses a GUI. The application we will change converts words from English into the children's language Pig-latin. Here are some examples of English words and their Pig-latin translation:
|
English |
Pig-latin |
English |
Pig-latin |
|---|---|---|---|
|
alphabet |
alphabetyay |
nerd |
erdnay |
|
billygoat |
illygoatbay |
orthodox |
orthodoxyay |
|
crazy |
azycray |
prickly |
icklypray |
|
dripping |
ippingdray |
quasimodo |
asimodoquay |
|
eligible |
eligibleyay |
rhythm |
ythmrhay |
|
farm |
armfay |
spry |
yspray |
|
ghost |
ostghay |
three |
eethray |
|
happy |
appyhay |
ugly |
uglyyay |
|
illegal |
illegalyay |
vigilant |
igilantvay |
|
jury |
uryjay |
wretched |
etchedwray |
|
killjoy |
illjoykay |
xerxes |
erxesxay |
|
limit |
imitlay |
yellow |
ellowyay |
|
messy |
essmay |
zippy |
ippyzay |
Examine them and see if you can come up with a rule for translating an English word into a Pig-latin word.
The program that we will be converting is contained in the file PigLatin.java. Lets take a look at this program and see how it solves the problem.
The first thing to look at is the main().
It uses the following algorithm to read in a sentence of words and print out a pig latin equivalent. We will make use of an abstract idea know as a parser. A parser will break down a sting of symbols into meaningful pieces known as tokens. In our case, the words in the sentence.
   0. Read in a line of input.
   1. Create a parser for the line of input.
   2. For each token (piece) of the line
      a. Convert the token to Pig-latin.
      b. Print out the converted token.
Take a moment and make sure that you understand how this solves the problem of translating a sentence into pig latin. Do you see any potential problems with this algorithm?
Notice that this part of the solution is mainly concerned with breaking the input line into words. If defers the actual translation of a word into Pig-latin to the method toPiglatin(). This break up of the problem will be beneficial to our efforts in converting to a GUI. The toPiglatin() method does not depend on the interface and therefore should not need to change.
We could write our own class which would implement a parser, but that is not necessary as Java has a class which does just what we want. Lets examine the StringTokenizer class and see how it helps us in the problem.
As was mentioned, a very general task is to break up a string into components called tokens. As an example, suppose we wanted to write a calculator program. If we wanted to evaluate the string "154 + 3*99" we would need to break it up into its component pieces. In this cases the tokens would be "154", "+", "3", "*", and "99". How did we decide where to break the string? We broke it up when we saw the symbols + and *. Some times the symbol we use to break up the string is important. In this example, "15*3" is very different from "15+3" and we would want the separator to be a token, too.
When we make a new StringTokenizer the arguments are
For our purposes we want to break the line into words, so the separator characters are space, tab, and newline. We will choose to include the separators as tokens. When we pass them to toPiglatin(), we expect them not to change. This way the spacing of our original sentence will be preserved.
The methods of StringTokenizer that we will use are
There are a couple of common algorithms to process tokens one at a time with a StringTokenizer:
   0. Create a tokenizer tk.
   1. While tk has more tokens
      a. Get a token.
      b. Process the token.
and
   0. Create a tokenizer tk.
   1. Let count be the number of tokens in tk.
   1. For i goes from 1 to count
      a. Get a token.
      b. Process the token.
We use the second one in our program.
Lets take a look at what that method does. It takes a String as input and returns another String which is the Pig-latin translation. Notice that this method depends on getting a word without any white space in it as a precondition. Our program uses toPiglatin() safely because the parser "guarantees" that the String it returns will not have white-space in it. Of course if there is an implementation flaw in StringTokenizer, this may not be the case. We will trust that it is correct.
Once again we are faced with the problem of breaking a String up into parts. This suggests that we can use StringTokenizer again. Upon some thought, we see that we want to break up our word based on the first vowel. Note that a vowel may be the first character in our word and we want to have different behavior if that is the case. Thus, we will want vowels to be included as tokens.
The line in the method that creates the parser for our word is:
  StringTokenizer parser = new StringTokenizer(aWord,
                                              "aeiouyAEIOUY", true);
Depending on whether the first token is a vowel or not, we will do different things.
If it is a vowel, we will append the string "yay" onto our original word. The only complication here is to decide if the first token is a vowel or not. Since this check is slightly clever it deserves to be placed in a separate method isVowel().
The method first checks to see if the token is exactly one character in length using the built-in method length() of the String class. If it is not exactly one character, we know that it is not a vowel. Once we know that it is a single character, we just need to check and see if it is a vowel. We could just check the character against each of the vowels one at a time, but we will use a trick to avoid this. We will see if we can find our string in "aeiouAEIOU". If we can, it is a vowel. If not, it isn't a vowel. The method indexOf() works with the String class and has the pattern:
someString.indexOf(lookFor)
It takes a String lookFor as an argument and will return the position of lookFor in someString. If lookFor is not in someString, it will return -1. So in the following code, if the value returned is -1, then aPiece was not a vowel. Here is the code:
   String checkString = "aeiouAEIOU";

   //See if we can find the single character in our check string
   //If index gives back -1 => not a vowel
   return !(checkString.indexOf(aPiece) == -1);
If it is not a vowel, then we need to split the word. For example, if we had the word "farm":
We need to split the word as "f" and "arm". We put them back together as "arm" , "f", and "ay".
If we look carefully, we need to split the word into the first token and everything else. To do this, we will use the length() and substring() methods of the String class.
To get the last part, we first compute the length of the first part using the method length(). What we need for the last part is the remaining letters. Lets take a look at the substring() method. There is a version which takes one argument:
The numbers 0, 1, 2, and 3 are the index values of the characters within englishWord, and can be used to access the characters within the String object.
So, for example:
englishWord.substring(2)
would result in the string starting with the character at index 2 or "rm". Because index values start at zero, if the first part has length n, the last part will start at index n. So the last part will be built using the code:
String lastPart = aWord.substring(firstPart.length());
Run the code and try it out with a variety of sentences. Does it behave as advertised? Are there cases which it does not handle adequately?
Building a graphical user interfacer (GUI) is as much of an art as it is a science. As such, it takes practice and experimentation to gain proficiency, as well as knowledge of the tools and media to be used.
In a typical GUI we will have a number of different components, such as buttons and text fields. We need to have some way of placing those components on the screen. A container is a class that will be able to hold a number of components. (In particular, Java implements the class java.awt.Container which tells how such an object works. The package java.awt holds the abstract windowing toolkit (AWT) library. We will use the more modern swing package, but underlying it is AWT.)
Because containers are also components, we can have containers that hold other containers. Some useful container classes in the swing package are:
A layout is an object that a container will use to decide how to place components. There are a number of layouts available. We will discuss three of the most basic ones.
This will evenly place components in a specified grid. For example, if we wanted to implement a tic-tac-toe game, we might use 9 buttons in a 3 by 3 grid.
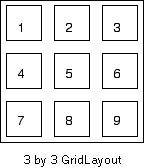
To use a GridLayout, we need to do three things.
Putting it all together, the following code would create something close to the picture above.
   setLayout(new GridLayout(3,3));
   add(new Button("1"));
   add(new Button("2"));
   add(new Button("3"));
   add(new Button("4"));
   add(new Button("5"));
   add(new Button("6"));
   add(new Button("7"));
   add(new Button("8"));
   add(new Button("9"));
A FlowLayout is a less rigid layout manager. The placement of components by a FlowLayout depends on the desired sizes of the components. It will place components in a centered line from left to right until no more components will fit. It will then start a new line. For example, depending on the size of the window, a FlowLayout might result in 9 buttons being placed as follows.
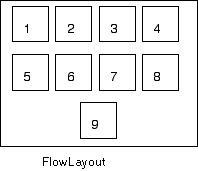
To use a FlowLayout, we need to do three things.
Putting it all together, the following code might create something like the picture above.
   setLayout(new FlowLayout());
   add(new Button("1"));
   add(new Button("2"));
   add(new Button("3"));
   add(new Button("4"));
   add(new Button("5"));
   add(new Button("6"));
   add(new Button("7"));
   add(new Button("8"));
   add(new Button("9"));
The BorderLayout is different from the ones above in that it always has 5 areas in which it can place a component. The basic scheme looks like the following picture:
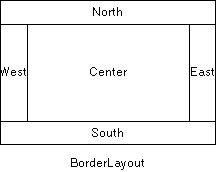
As with the previous two kinds of layouts, to use a BorderLayout, we need to do three things.
Putting it all together, the following code might create something like the picture above.
     setLayout(new BorderLayout());
     add(new Button("Center"), BorderLayout.CENTER);
     add(new Button("East"), BorderLayout.EAST);
     add(new Button("West"), BorderLayout.WEST);
     add(new Button("North"), BorderLayout.NORTH);
     add(new Button("South"), BorderLayout.SOUTH);
The actual size of these five regions will depend in part on the desired size of the components. We also do not have to place components in all of the five regions.
Note that all of these layouts have constructors which take more arguments that give the user more control over the spacing of the components. To find out more information about all of these classes, you can look at the Java 2 SDK v1.2 API documentation provided by Sun.
Let us think about the design we wish to have for our Pig-latin translator. What are the kinds of components we would like to have in our interface? We need to have some kind of message telling the user of the applet how to operate it. We need to have some way of getting a sentence. We need to have some way of displaying the translated sentence. We need to have some way of telling the applet we are finished looking at the result.
We will look at two basic kinds of components and see if they can help us.
A JLabel is intended to hold a short message or an image. Two of the constructors that we can use to create a JLabel are:
Once we have a JLabel object, some of the methods it will respond to are:
A JTextArea is intended to hold a multiline plain text message. It can be scrolled if placed in a JScrollPane, but on its own will not scroll. It does not offer as many capabilities as the other multiline text components, the JTextPane and the JEditorPane.
Two of the constructors that we can use to create a JTextArea are:
Once we have a JTextArea object, some of the methods it will respond to are:
With what we know, the only component that will allow us to input a String is the JOptionPane. Once we have the input, one possible design for our interface would be something like this:

We can use the following components to implement this design.
|
Component |
Type |
Name |
|---|---|---|
|
icon holder |
JLabel |
descImage |
|
input area |
JTextArea |
inputArea |
|
output area |
JTextArea |
outputArea |
|
description |
JTextArea |
descArea |
|
description panel |
JPanel |
descPanel |
|
the whole thing |
JApplet |
-- |
When making the decisions to use these components, implicitly a decision was made as to the layout. In particular, it was decided that the JApplet would use a BorderLayout. This is partially motivated by the fact that a JApplet will use a BorderLayout by default, so we don't need to do a setLayout().
Once that decision was made, the placement of the icon and description message looks to be in the north border. But we can only put one component there, so we will create a description panel with a 1 by 2 grid layout to hold them. We will try placing the input area in the north position and the output area in the south position. The remaining two areas will be left empty.
The first thing that we want to do is to make a copy of PigLatin.java and call it PigLatinApplet.java. We will make all our changes in PigLatinApplet.java.
We need to import the appropriate packages.
   import java.awt.*;
   import javax.swing.*;
We need to change the name of the class to PigLatinApplet and make it extend JApplet.
We need to change the main() into init(), so replace the entire first line of the main() method with the following:.
public void init()
Applets work differently from an application in that they are activated within the context of a web page, also known as an html file. Once we have a web page that activates the applet, we can view the applet by loading the web page into a web browser, or by loading the web page into a separate application called appletviewer.
To facilitate this, we have provided a simple web page named PigLatinApplet.html which will activate the applet. To download this file (as opposed to viewing it in your browser), right-click on this link, and then use the menu that appears to download/copy the file into your project directory.
To review, the three things that we need to have in the framework for an applet are:
The whole collection of components that makes up an applet is called the interface. There are certain basic things that every GUI will need to do to create the interface. These are:
Lets take these in order.
To declare a button named xButton we would use code like:
JButton xButton;
Refer back to the design section and declare each of the five components that we need just before the definition of init().
Note: Some programmers follow a convention where each component includes its type as part of its name. Suppose for example, that we wanted to have a "go" button and a closely associated label. We could name them goButton and goLabel and help maintain that association.
We need to do a new for each of the components we want to create. For example, to create the descImage we would write:
descImage = new JLabel(new ImageIcon("icon.jpg"));
(Right-click on the link above to save your own copy of the icon.)
The constructor for our JPanel does not need any arguments. The constructors for the JTextAreas should be passed a string which will be their original contents.
Add each of the declarations inside init() just after the opening brace.
In this case, we have two containers. Our applet and descPanel. By default, a JApplet will use a BorderLayout, so we don't need to do anything for it.
We do, however, need to set the layout for the panel we created.
The following line of code will make it a grid type layout as decided upon in our design:
descPanel.setLayout(new GridLayout(1,2));
Add it in after the code which creates the components.
Each of the five components we created must be added somewhere.
Two of the components need to be added to the descPanel. The following code will add descImage to that panel:
descPanel.add(descImage);
The other three components will be added to our applet. To do so, however, we need to add them to the appropriate container. The method getContentPane() returns the container we need to use. For example, to add the descPanel we would do the following:
getContentPane().add(descPanel, BorderLayout.NORTH);
Add all five components just after the code to set the layouts, experimenting as needed to achieve a pleasing appearance. Remember, user-interface design is as much an art as it is a science!
Comment out the code that was originally from the main() of PigLatin. We will need it later, but for now we would just like to see our interface.
Compile and run your applet, either by using the appletviewer application:
appletviewer PigLatinApplet.htmlor by loading the page into your web browser. Continue debugging until it works appropriately. The height and width of the applet are determined by attributes set in the html file, which you can open and modify with your editor. Feel free to experiment with these settings until your applet's size is appropriate for the components it is displaying. (Don't forget to save your modified html file, or your modifications will not be applied when you reload the page.)
You can now uncomment the original code. We now need to replace any code that uses theKeyboard or theScreen with something appropriate for our GUI.
Replace the code
  theScreen.print("\nTo translate a sentence from English to Pig-latin,\nenter a sentence: ");
  String line = theKeyboard.readLine();
with an appropriate use of JOptionPane that returns the string to be processed.
We would like the input string to be displayed in our interface. Remember that one of the methods that a JTextArea understands is append(). Use the following line of code to append the input we just obtained onto inputArea:
inputArea.append(line);
This just leaves the output lines
   theScreen.print(piglatinWord);
   theScreen.println("\nTranslation completed!");
The first line should be replaced with an append() to outputArea. The second line can be removed completely.
Test the code and do any needed debugging.
Applet, Interface, Panel, Container, Grid layout, Flow layout, Border layout, Label, Text Area, StringTokenizer, Token.
Turn in to your instructor a hard copy of your final version of PigLatinApplet.java.
Don't forget to clean up. Among other tasks you may need to save your work to a floppy, remove your originals from the hard drive, etc.
Back to This Lab's Table of Contents