list Class TemplateWe have seen that the vector container provided by the
Standard Template Library (STL) can be used to store a sequence of values
that are all of the same type. Another useful STL container for storing
sequences of values is list. Except for
operator[], at(), capacity(), and reserve(), any of the operations that can be applied to a vector can also be applied to a list.
This lab exercise will explore the differences between these two containers — how they differ, under what circumstances should each be used. It consists of five experiments to time how long it takes to perform each of five different operations on each container.
list
or vector.list or vector
of length n.list or
vector.list or vector of length n.list
or vector.Timer.h and
Timer.txt implement the timer used in
all of the experiments (there is no Timer.cpp).Timer class.list and vectorvectorConsider this declaration:
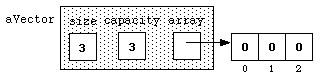
This definesvector<int> aVector(3);
aVector as an object that stores three
int values, and it initializes each element to zero (the
default int value). We might picture it as
One key property of a vector is that the elements of a vector
are allocated in adjacent memory locations. That is, in the
computer's memory, aVector[0] is physically next to aVector[1], which is physically next to aVector[2], and so
on.
listThis allocates a sequence of linked nodes, consisting of a head node and three additional nodes, linked together with pointers. We can picture this aslist<int> aList(3);
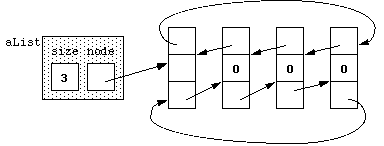
A pointer is a special kind of variable that can store the
address of an object. Each node in a list
contains two pointers: one pointing to the next node in the sequence and the
second pointing to the previous node, as pictured above.
Because these nodes are connected using pointers, they need not
be in adjacent memory locations; they can be anywhere in a program's free
store of memory. By following the pointers, we can get from
aList to the the node at the head of the list without
any data in it. This node is called the head node and
is there to provide a starting node for the next and previous pointers.
Using the next-node pointer of the header node we can get to the first
node of the list; from its next-node pointer we can get to the second node of the list; and
so on. We can go through the list in reverse order by following
the previous-node pointers. A list's nodes can be scattered
throughout memory and the order of the values in the list is
determined solely by the next-node and previous-node pointers of the
nodes.
Because the elements of a vector are stored in adjacent
memory locations, the subscript operation can be performed
efficiently for a vector. The expression aVector[i]
to access the i-th element of aVector involves a
simple arithmetic computation:
By contrast, trying to access the i-th element of aaVector.array + (i * sizeof(int))
list
requires starting at the pointer stored in node and
following it to the head node; then follow its next-node pointer to reach
node #1; follow its next-node pointer to get to node #2; and so on until
we reach node #i. This requires a loop and doing a computation
for each pointer we follow, which is obviously more time consuming that the
vector's simple math computation.
Timer ClassThe Timer class stored in the file Timer.h
can be used to measure the elapsed time in each experiment below. It
computes time in seconds like a stopwatch and provides the following
operations:
Statement Meaning Timer aTimer;Constructs aTimeras aTimerobject.aTimer.start();Starts aTimerrunning.aTimer.stop();Stops aTimer.aTimer.reset();Resets aTimerto zero.cout << aTimer;Displays the elapsed time recorded by aTimer.aTimer.getSeconds()Returns the current value of aTimer.
The Timer class is built using the clock()
function from the standard C library ctime. This means that it
is only as accurate as this clock() function.
Most of the operations that we test in this exercise are very
fast — so fast that the program probably will not notice them
running at all because the timer cannot measure fractional seconds
very well. So, instead of timing just one run of a test, the
programs run each test many, many times — 1000 times, by default
— and then computes the average time. (Note: you can change the number
1000 by changing the value of the constant ITERATIONS if the
tests take extraordinarily long on your computer.)
The driver for each experiment does the following:
n, which is
the size of the container in the first two experiments and the number
of elements added to containers in the last three.list using n.vector using n.list and for a vector.Regardless of which container is being tested and the test being conducted, the tests themselves have the same structure:
ITERATIONS times:
For each experiment, execute the program on sets of values ranging in size from 100 through 2000 in increments of 100. (Your instructor may have a different range of values to use, depending on the computer and compiler you use.)
Record your results and enter them into a spreadsheet. Then graph the
results: mark off the values for n on the horizontal
axis and the time it takes to do the operation on the vertical axis.
Use different colors (or symbols) for the points, one for the
list results and another for the vector
results.
Experiment #1: Creating New n-Element Containers
Experiment #2: Appending One Value to a Container of Size n
Experiment #3: Appending n Values to an Empty Container
Experiment #4: Prepending One Value to a Container of Size n
Experiment #5: Prepending n Values to an Empty Container