In this lab, we'll build an HTML page with client-side processing directives. useful to us in this course, namely basic formatting, lists and tables. It may be helpful to have the following reference materials handy:
Our goal is to make a web page that looks like this:
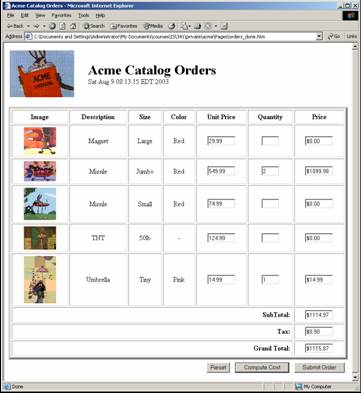
As you can see, this page allows a user to select quantities of Acme products to purchase. Presumably, the unit prices of the items will come from a database server somewhere and the submit button will formally submit the order to a server; These functions require server-side processing, so we'll ignore them for the moment. The "Reset" and "Compute Cost" buttons, on the other hand, can be implemented using client-side processing. The reset button will reset the correct prices for the items and will zero out all the other fields. The compute cost button will sum up the costs of the specified quantities of each item, add tax, and display the final result.
Getting Started
Start by downloading a preliminary page. Familiarize yourself with the file and then add client-side-code to include the current date. We did an example for this in class. Here are some notes on the development environment we'll use for this:
- We're using Microsoft Visual Studio as a development environment in this course, so use it again here. You can right-click on the .htm file and select "Edit with Visual Studio.Net" to start the environment. Note that we will not be exploring all the capabilities of the VS.Net environment, there is just too much there and using it tends to obscure the underlying principles. Thus, for this lab, stick mostly to the HTML editing mode, i.e., use the "HTML" tab rather than the "Design" tab. When you feel that you are understanding the HTML code that VS.Net is creating for you, you can start to use the WYSIWYG features of the Design mode.
- To display the web page we're working on, we'll primary use a standard browser like IE, Netscape or Mozilla. You'll notice when using VS.Net to add the date to your page, that the actual date won't show. Load the page into IE (i.e., by starting IE and selecting File-Open-Browse) and the date will appear.
Go ahead and add the date script now and verify that it displays properly in IE. Note that we aren't actually requesting the lab8.htm page from a web server using the HTTP protocol (i.e., by requesting "http://someserver/lab8.htm"). How is it that the date still appears properly?
HTML Forms
In the target page, shown above, there are a number of input boxes and buttons. These can all be implemented in a standard browser (IE, Netscape, Mozilla) using HTML forms. Start by creating an empty HTML form just after the header table that is already in the file. Remember that HTML forms look like this:
<form name="some-form-name-here">
...
</form>
Choose a form name (e.g., "frmOrders") and remember it. The common practice is to start the name with "frm" to distinguish it from other HTML elements. This form will be empty when you display it in IE. In the next sections, we'll add all the tables, table elements, images and form input elements.
A Product Table
Now, we're ready to add the table of Acme products for sale. The table-like formatting you see in the target page image is based on HTML tables. Here is a bit of the table definition that I used:
<table width="100%" border="5" cellspacing="3" cellpadding="5">
  <tr>
    <th>Image</th>
    <th>Description</th>
    <th>Size</th>
    <th>Color</th>
    <th>Unit Price</th>
    <th>Quantity</th>
    <th>Price</th>
  </tr>
  <tr>
    <td align="center">an image</td>
    <td align="center">product name</td>
    <td align="center">product size</td>
    <td align="center">product color</td>
    <td align="center">unit price input box</td>
    <td align="center">quantity input box</td>
    <td align="center">line total input box</td>
  </tr>
...
</table>
Copy this into your htm file and replace the first row's image, name, size and color with values that make sense. If you cut and past the code, be careful to change any HTML character codes (e.g., "<") to the correct ASCII value (e.g., "<"). You can include any product that you'd like - there are a number of samples in the lab 8 folder (hangglider.jpg, harpoon.jpg, magnet.jpg, missle.jpg, mousetraps.gif, rocket.gif, smallrocket.jpg, superwile.gif, tnt.gif, umbrella.gif, WCsail.gif, WCtrap.gif, windsurfer.jpg). Here are some things to note about this process:
- The th tag sets up a table header using a centered text in bold type. Leave that part of the file alone.
- Include the image using the standard img image tag, which I used to include the "acme catalog" image already on your page. Your images may have different sizes, so I fixed there size by adding a width="75" attribute to the img tag.
- We'll display the unit price, quantity, and total unit price using
text input boxes. This is a bit silly given that the user shouldn't
get to "input" the unit or total item prices. In a couple of weeks,
we'll grab these values from a database server. For now we'll do it
this way. Use the HTML form text input box for this:
<input type="text" NAME="txtPrice" size="7">
Include this inside the appropriate td tag in the table (labeled "unit price input box" above). - Add similar input boxes for the quantity and price as well.
Adding More Products
Now that you have one product in the table, we can copy your table row definition (tr) for other products, filling in new values as appropriate. Create rows for 4 or 5 products, include one that isn't in the target page above. You can choose from the product images (listed above) or grab a new one of your own (Google's images page is a good place to do this provided you're careful about copyright issues).
When you make copies of your table row, be sure to use the same value for the name attribute in all of the rows. For example, all your unit price input boxes should have name="txtPrice". This will allow us to access all the unit price values later as a single array rather than as individual fields.
Command Buttons
The final visual element of the web page is the set of 3 command buttons at the bottom. We'll use these to initiate our client-side processing. HTML forms provide three types of command buttons:
- Command Button ("button") - This is a generic command button that can be linked to any function.
- Submit Button ("button") - This is a specialized command button used to submit the contents of the form for processing.
- Reset Button ("button") - This is another specialized command button that automatically clears all the input boxes in the form.
We'll build the "compute cost" button in lab, and save the reset and submit buttons for project #9. Here is the "compute cost" button definition that I used:
<input type="button" value="Compute Cost" onclick="return computeCost()" NAME="Recompute">
The type specifies that it is a generic command button, the value specifies what is written on the button, the onclick specifies the JavaScript code that is run when the button is clicked. In this case, it will call a function named computeCost(), which we will define below.
Client-Side Processing using JavaScript
Setting initial prices:Now that we have the basic form elements in place, we can implement the client-side processing routines compute prices. As we did in class, add the script tag to the top of the HTML file:
<script language="javascript">

</script>
We'll now add a number of processing routines that will be defined when the HTML file is loaded by the browser. Start by adding the basic prices of the items, a job that we'll do in a better way later. For now, modify the HTML start body tag as follows:
<body onload="setPrices()">
This tells the browser to run the JavaScript function setPrices() every time the browser loads this page. We would like this function to set the canned prices for each of the times in the catalog. Do this by adding the following script code:
function setPrices() {
  // A dumb function to set the unit prices.
  // We'll base this on a database later in the class.
  document.frmOrders.txtPrice[0].value = "29.99";
  document.frmOrders.txtPrice[1].value = "549.99";
  document.frmOrders.txtPrice[2].value = "74.99";
  document.frmOrders.txtPrice[3].value = "124.99";
  document.frmOrders.txtPrice[4].value = "14.99";
  }
This function will set the txtPrice text input box from the frmOrders form on the current document to the price of the first item to 29.99, 549.99 for the second item, and so forth. Make sure that you understand the dot notation before going on.
Note that the name txtPrice is the name we gave to all the unit price text input boxes in column five of the table. Because they all have the same name, the browser treats the name txtPrice as an array of values, one for each row. Note that the rows are numbered from 0 to 4 rather than from 1 to 5. Save these changes and load the file in the browser. You should see that the prices are all set in their appropriate boxes. Note that the number of values you set must match with the number of rows in your table.
Computing total order cost:Now, we can include a function that adds up the total price of the order based on the unit price, quantity of each unit, and a 6 percent sales tax. This will involve some arithmetic JavaScript code that will look very similar to standard Java. Start by adding the following code:
function computeCost() {
  // Compute the total cost of the order based on the unit price and
  // quantities for each.  Add a 6 percent sales tax.
  setPrices();
  var total = new Number();
  var price = new Number();
  var quantity = new Number();
  for (var i=0; i < document.frmOrders.txtPrice.length; i++) {
    price = parseFloat(document.frmOrders.txtPrice[i].value);
    quantity = parseFloat(document.frmOrders.txtQuantity[i].value);
    if (!isNaN(price) && !isNaN(quantity)) {
      total = price * quantity;
      document.frmOrders.txtTotal[i].value = "$" + total.toFixed(2);
      }
    }
  // Add code here to compute the sub-total, the tax and the grand total.
  }
Study the code carefully, noting the following things:
- The function starts by resetting the prices. The way it is implemented now, the user could change them, which is certainly not what we want.
- It creates the utility variables total, price and quantity. This syntax is very similar to standard Java, except that we use the designator var rather than the type, and the type Number exists in JavaScript, but not Java.
- The for statement loops through all 5 elements of the txtPrice text box array. Assuming that there are the same number of prices, quantities, and unit total prices, this loop computes the total price for each row based on the unit price and the quantity.
- The values for price and quantity are created by parsing the strings in txtPrice and txtQuantity. This is required because values in text fields are strings rather than numbers. To do any arithmetic on them, they must be parsed into numbers using functions like parseFloat or parseInt.
- The if statement check to see if either price or the quantity is "not a number" (NaN). If either is NaN, then the computation is not made; the JavaScript interpretor would raise an error if it were asked to add elements that were not numbers. This error might occur if the user typed a letter in the quantity box rather than a numeral.
- The loop concludes by setting the row's txtTotal text box to the computed total. Note that we format the real number as currency, i.e., with two fixed decimal places.
When you get the this function running and understand it properly, add more code to compute the sub-total, the tax and the grand total.
Checking In
Submit your completed page in KV. If you worked in a team, be sure to save a copy of your page for each team member for future use. You can now go on to project #8.
Back to the top
