In this lab, we will build a inventory tool for the Movies database similar to the one discussed in the class lectures. The tool will be based on an ASP.Net DataGrid and will look something like this:
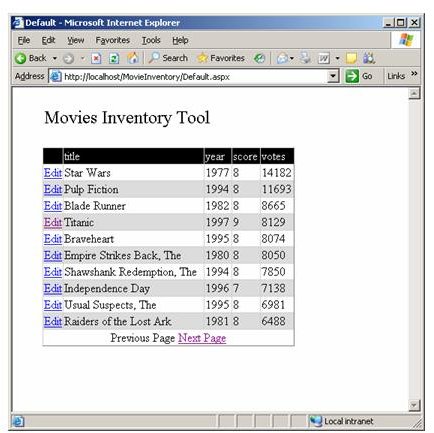
You'll note that this interface, though a bit simpler than the one discussed in class, is still built using objects of the following classes:
- SqlDataAdapter - This serves as an interface between the SQL Server Movies database and the VB.Net server-side code.
- DataSet - This stores the data from the database in the VB.Net server-side code.
- DataGrid - This presents the data on the client and mediates the user interaction.
It also still supports the following features:
- Formatted Data - The DataGrid presents the Movies data in a formatted HTML table.
- Editing - The user can edit the values of any of the rows by clicking on the "Edit" button. Note that the ID number is hidden so the user can't mess with it.
- Paging - The DataGrid will split the rows into pages of X rows each, where X is configurable.
- Sorting - The user can sort any of the columns in ascending order by clicking on the column header.
Before starting the lab, be sure that you understand the functionality displayed here and the tools that you'll be using to implement it.
Building the Base Project
Start by building a new VS.Net project. At the end of this section, the workspace will look like this:
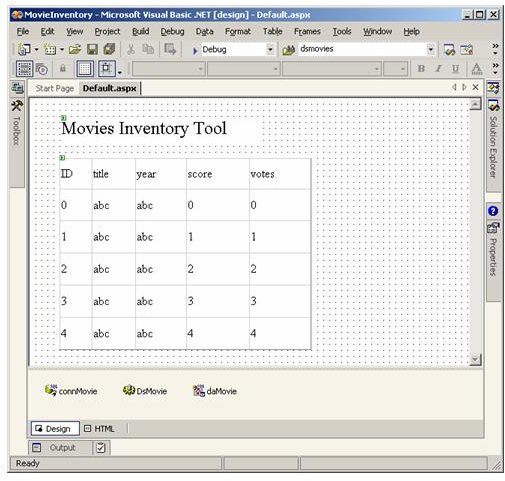
Notice that I've been careful to name my objects using a consistent scheme - you may choose to use the default names as I did in the lecture. I've also named the main form Default.aspx so that IIS will serve it up automatically without typing the full filename. Proceed as follows:
Insert an SqlDataAdapter as we've done in the past. Note the following things:
- Create an SqlConnection to the Movies database, allowing the system to save the SQL Server password in the connection string.
- Use the SQL Command SELECT * FROM Movie. VS.Net will create all the other SQL commands (i.e., INSERT, UPDATE, DELETE) automatically.
- Add the DataSet by clicking mouse-right on the data adapter and choosing "Generate DataSet".
Place a Label on the canvas as a page title. Build and load the application to make sure that things set up properly.
Place a DataGrid on the canvas and configure it as follows:
- Open the Properties Builder by clicking mouse right on the DataGrid and choosing "Properties Builder".
- Tell the DataGrid where to get its data by setting the "DataSource", "DataMember", and "Data key field" fields appropriately. For DataMember, you may have to just type "Movie".
- Build and Load the application. You won't see any displayed data yet because we haven't filled the dataset or bound the DataGrid.
Loading the Data
To display the data, add the following code to your application backing code file:
This code goes in your Page_Load() event handler:
   'Initialize the sorting arguments and data.
   If Not IsPostBack() Then
      FillAndBind()
   End If

These are new procedures to add:
Private Sub FillSortedDataSet()
   'Refill the dataset with the appropriate sorting.
   your-data-adapter.Fill(your-data-set, "Movie")
End Sub

Private Sub BindDataGridWithHeaders()
   'Rebind the datagrid with the appropriate headers.
   your-data-grid.DataBind()
End Sub

Private Sub FillAndBind()
   FillSortedDataSet()
   BindDataGridWithHeaders()
End Sub
This code fills the DataSet by using the DataAdapter to mediate between SQL Server and the DataSet, and then binds the DataSet to the DataGrid. Be sure to get the names of your various objects specified correctly, and to match the 2nd argument of the Fill() method to the "Data Member" setting in the DataGrid Property Builder. Note that the function decomposition doesn't make must sense yet, but it will later.
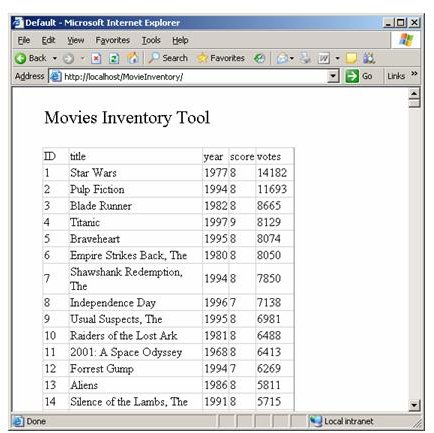
You should now be able to rebuild/load your application and see movies data presented in a simple HTML table format like this:
Formatting the Presentation
Take some time now to format the output to your taste, as follows:
Remove the "ID" field from the display by:
- Choose "Property Builder"-"Columns".
- Turn off "create columns automatically".
- Add all the fields manually, including ID.
- Turn off the ID "visible" property.
Format the remainder of the table as you see fit. You can set the column and row formatting attributes by choosing "Property Builder"-"Format". Don't spend too much time here; just get something that looks ok.
Adding Edit Capabilities
Now, you can add the edit capability by choosing "Property Builder"-"Columns" and adding a new "Edit, Update, Cancel" column; it's buried down at the bottom on the column list. Add it as the left-most column, and then add the following event handlers to your code to handle the Edit, Cancel and Update post-back events:
Private Sub your-data-grid_EditCommand(ByVal source As Object, ByVal e As System.Web.UI.WebControls.DataGridCommandEventArgs) Handles your-data-grid.EditCommand
   'Edit the datagrid row in the click event's item index.
   your-data-grid.EditItemIndex = e.Item.ItemIndex
   FillAndBind()
End Sub

Private Sub your-data-grid_CancelCommand(ByVal source As Object, ByVal e As System.Web.UI.WebControls.DataGridCommandEventArgs) Handles your-data-grid.CancelCommand
   'Reset the datagrid's edit item to nothing.
   your-data-grid.EditItemIndex = -1
   FillAndBind()
End Sub

Private Sub your-data-grid_UpdateCommand(ByVal source As Object, ByVal e As System.Web.UI.WebControls.DataGridCommandEventArgs) Handles your-data-grid.UpdateCommand
   'Refill the dataset in sorted order so we can edit it.
   FillSortedDataSet()

   'Loop through the edited row's columns, updating the dataset values.
  Dim MovieRow As DataRow = your-data-set.Movie(e.Item.DataSetIndex)
   Dim i As Integer
   For i = 2 To your-data-set.Movie.Columns.Count
       MovieRow(your-data-set.Movie.Columns(i - 1).Caption) = CType(e.Item.Cells(i).Controls(0), TextBox).Text()
   Next

   'Re-synch the dataset with the database.
   your-data-adapter.Update(your-data-set)

   'Turn off editing in the datagrid and bind the new values.
   your-data-grid.EditItemIndex = -1
   your-data-grid.DataBind()
End Sub
Again, be careful to insert the proper names of your objects. When done, this should allow you to edit the values in your DataGrid as we did in class.
Adding Paging Capabilities
The Movies database is large enough that you don't want to present the entire table all at once. To add paging, go to the "Property Builder"-"Paging" and set "Allow Paging". Now modify your code as follows:
Private Sub your-data-grid_PageIndexChanged(ByVal source As Object, ByVal e As System.Web.UI.WebControls.DataGridPageChangedEventArgs) Handles your-data-grid.PageIndexChanged
   'Move to the appropriate page of the data and refill/bind.
   your-data-grid.CurrentPageIndex = e.NewPageIndex
   FillAndBind()
End Sub
The resulting interface should look something like this:

Adding Sorting Capabilities
To add sorting, modify your code as follows:
Open the "Property Builder" and set "Allow Sorting" in the "General" tab.
In the "Columns" tab, set the "Sort Expression" for each column to be the appropriate column name from the database.
To set the default ordering, add this line just inside the beginning of the If statement in Page_Load():
Viewstate("SortedColumn") = "title"This code will run only when IsPostBack() is false. As discussed in class, the ViewState() method allows you to set named variables to be saved between different post-back sessions.
To add the appropriate "ORDER BY" clause to the SQL SELECT command, add this line to the beginning of FillSortedDataSet():
your-data-adapter.SelectCommand.CommandText &= " ORDER BY " & ViewState("SortedColumn")This configures the SQL Select statement used by your DataAdapter to fill the DataSet.
Add the following sort event hander function:
Private Sub your-data-grid_SortCommand(ByVal source As Object, ByVal e As System.Web.UI.WebControls.DataGridSortCommandEventArgs) Handles your-data-grid.SortCommand
   ViewState("SortedColumn") = e.SortExpression
   FillAndBind()
End Sub
This handler will be called whenever the user clicks on one of the DataGrid header names.
Your system should now have basic display, edit, paging and sorting capabilities. Verify that other people in the lab can load and use your web application.
Checking In
Submit the URL of your page in KV.
Back to the top

