
Aside from computer processors, Moore's Law has also affected other digital technologies, such as the image sensors used in digital cameras, camcorders, and smart phones. Thanks to Moore's Law, today's devices can take larger pictures (measured in megapixels) than their predecessors. For example, when digital cameras took "small" photos (e.g., 1-2 megapixels), sequential programs were sufficient to process the images, but as photos get larger (e.g., 20, 40, 80, 120, ... megapixels), processing those images sequentially may take too much time. And since the era of the "free lunch" is over, we cannot count on faster CPUs to speed up this processing. However, we can speed up the processing of large images by using the cores of our computer to process different parts of that image in parallel.
In this exercise, we will explore how the parallelization can be used to speed up an image-processing operation. We will start by timing the sequential version of an operation. Then we will convert that operation to a parallel version that will run faster on a multicore CPU, and time that parallel version using different numbers of cores. Finally, we will explore different ways such an operation can be "parallelized".
One way that one picture element or pixel of an image can be represented is as an RGB (Red, Green, Blue) color. For our purposes today, an RGB color is a triplet, each component of which has a value from 0 to 255. The first value in the triplet (R) represents the pixel's Red intensity, the second value (G) represents the pixel's Green intensity, and the third value (B) represents the pixel's Blue intensity. Each pixel's color is determined by its combination of these R, G, and B values, and each distinct combination of the three values produces a unique color. For example:
Using this approach, a pixel can be set to any of 256 x 256 x 256 = 16,777,216 different colors, including 256 different shades of gray.
(For the sake of completeness, most pixels today also have a fourth component called the alpha value, denoted by the letter A. A pixel's alpha value controls its opacity: if a pixel's A-value is 0, it is completely transparent; if its A-value is 255, it is completely opaque; values in between 0 and 255 make pixels translucent. We will not use our pixels' A-values in today's exercise, but they are there, if you want to experiment with them in this week's project.)
Some common image-processing operations include: color inversion, color to black and white conversion, color to gray scale conversion, color to sepia conversion, image flipping (horizontal or vertical), image rotation (left or right), red eye reduction, line detection, and others.
Many of these operations use a similar approach, which we might describe with the following sequential pseudocode algorithm:
    Canvas canvas0;
    canvas0.loadImage(imageFile.jpg);
    ...
    Canvas canvas1;
    for each row r in canvas0 {
        for each column c in canvas0 {
            // using the pixel ar row r, column c on canvas0,
            // do something with the pixel at row r, column c on canvas1
        }
    }
The operations main differences lie in what they do with the pixel,
inside the inner loop.
It should be evident that the vast majority of the time required by one of these operations will be spent in the nested for loops. Keep that in mind as we proceed.
For simplicity's sake, suppose that we are using the preceding nested loops to process a 4x5 = 20 pixel image. We might visualize this image as follows, where each pi represents one of the image's pixels:
We see this image as a 2-dimensional structure with 4 rows and 5 columns, and the nested loops will process the pixels row-by-row, as shown by the blue line below:
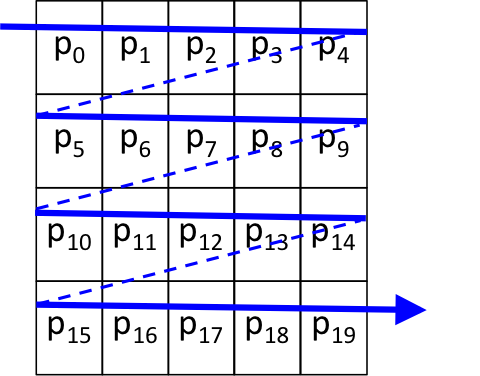
However, since the image's pixels are stored in memory row-by-row, and the computer's memory is a 1-dimensional array of bytes, the image's 20 pixels are actually stored in memory as follows:
![]()
In the nested for loops that process the image, the outer loop controls the row number and the inner loop controls the column number. With this arrangement, the two loops will access the pixels sequentially, stepping through adjacent locations in the computer's memory:

To parallelize our image-processing operation, we will use a library called OpenMP that is supported by most modern C/C++ compilers, including the GNU compiler suite (gcc/g++), the C/C++ compilers in MS-Visual Studio, and Intel's C/C++ compilers.
To see how multithreading works, suppose that we have a normal C/C++ method, and the flow of work it does (i.e., the sequence of statements it performs) is represented by a blue line. A traditional program might look like this, as it executes from start to finish:

Suppose further that the operations in the method between time t and time t+4 can be performed in parallel. When this is the case, a programmer can embed an OpenMP #pragma directive into his or her program to form a parallel region. When the program execution reaches one of these parallel regions, the program's single work-flow divides into multiple threads, normally one per core. So on a quad-core CPU, our picture above changes to one like this:
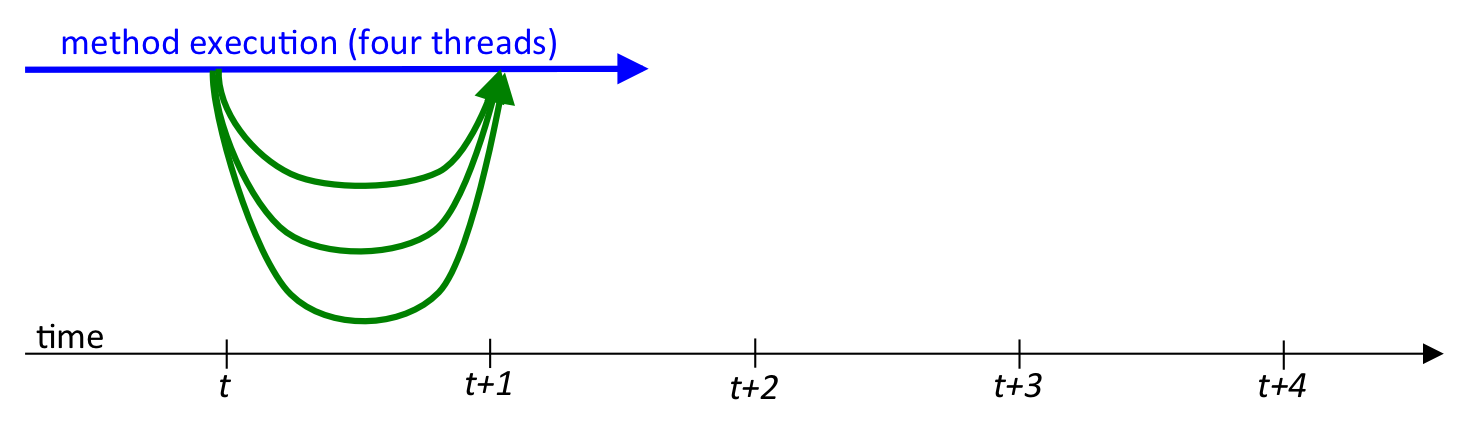
In this diagram, the blue line represents the original "parent" or "master" thread, and the green lines represent the new "child" threads that OpenMP forms when the program flow reaches the parallel region. On a quad-core computer, each thread can run in parallel on a different core. If we structure our code so each of the four threads does about 1/4 of the work, then the total amount of work done during the computation remains the same, but because each thread does its piece of the computation in parallel with the others, the method will finish much faster than if a single thread was used.
In today's exercise, we will be using this approach to "parallelize" an image-processing operation, so that it runs faster. To see how, let's return to our simple 4x5 image. As we saw earlier, a single-threaded program just processes the image's pixels, one at a time, in sequence:
However, if we had two threads instead of one, we might divide up the work so that the parent thread processes the top half of the image and the child thread processes the bottom half:
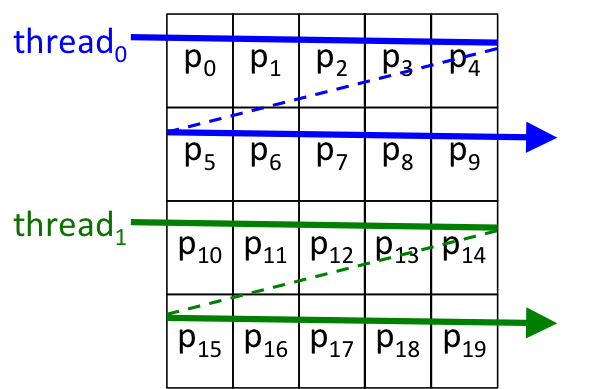
Recalling that the image is stored in memory row-by-row, this approach will cause each of the two threads to process its own "chunk" of the pixels:

What if we had four threads? It should be evident that then we could give each thread 1/4 of the image to process:
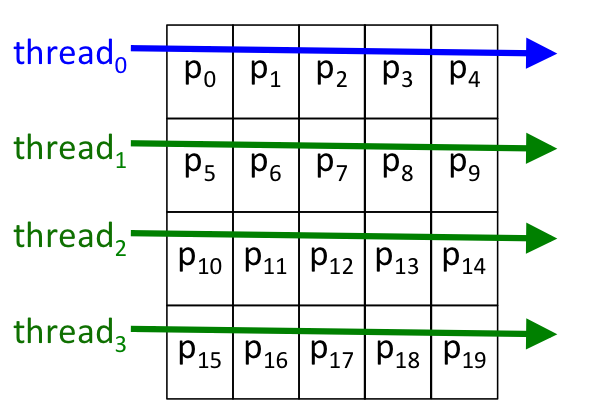
in which case each thread would still get its own "chunk" of the pixels to process:

The approach we will use today is:
As you can see, an important part of today's exercise is timing the operation. The more applications you have running, the more competition your program will have for memory and the CPU, and the less accurate your timing results will be, so close down all non-essential applications (e.g., e-mail, chat clients, extra browser tabs, etc.) before proceeding.
With that by way of introduction, let's get started.
In the open source world of Linux/Unix, the source code for a software project is often distributed as a tarball -- a folder of files that has been archived using the tar command, and then compressed to make it consume less space. Because we have several files for today's exercise, we have combined them into a single tarball for you to download, so that you don't have to download each file individually.
Our tarball is named ImageConverter.tgz, so begin by downloading it. Save it somewhere convenient (e.g., your desktop). The .tgz extension on this file indicates that it was tarred and then compressed with the GNU ZIP-compression utility gzip.
To open the tarball, launch a terminal, and use the ls and cd commands to navigate to the directory/folder where you saved the tarball.
When you are in right folder, enter this command:
tar xvzf ImageConverter.tgz
   begin/
   begin/ImageConverter.cpp
   begin/Makefile
   begin/pics/
   begin/pics/colorCrayons.jpg
   begin/pics/coloredMarkers.jpg
   begin/pics/colorfulCars.jpg
   begin/pics/redEye.jpg
   begin/pics/beads.jpg
   begin/main.cpp
   begin/ImageConverter.h
If you enter the ls command, you should now see both the ImageConverter.tgz tarball and the begin folder listed. If you enter:
ls beginyou should see these files listed:
   ImageConverter.cpp
   ImageConverter.h
   Makefile
   main.cpp
plus a folder named pics that contains some colorful image files.
To create a new project for today's exercise, launch Eclipse as usual, but use the following steps instead of our usual procedure:
Once you have created the new project as described above, import all the files (using Select all in the Import dialog box) from the begin folder into your new project.
Then open main.cpp, ImageConverter.cpp, and ImageConverter.h, and take a few minutes to look over their contents, to see how they relate to one another. Once you understand what each file does, continue.
In the open source Linux/Unix world, a program called make is used to compile a tarball's source code into an application. To coordinate the compilation, a file named Makefile is usually included in the tarball. The tarball for this exercise includes a Makefile to simplify the task of building our multicore application, which is the reason we told Eclipse to create an empty Makefile project.
(Explaining how make works is beyond the scope of this exercise, but a Makefile is a text file, so feel free to open up the Makefile in Eclipse and examine its contents. If you are interested in learning more about how it works, here is a tutorial on make that will get you started.)
The make program reads this file and uses the relationships and commands on these lines to compile and link the files in the project.)
Given this Makefile in your project folder, you should be able to build and run your project from within Eclipse, as usual. When you build your program, Eclipse will execute
make allin your project folder, the same as usual. This will invoke the make program, tell it to build the target all, and it will look for a file named Makefile that tells it how to do that. When make is finished building your program, you should be able to run it from within Eclipse, as usual.
It is worth mentioning that in a standard (i.e., non-Makefile) Eclipse project, there is still a Makefile behind the scenes that coordinates the compilation and linking. The difference is that in a standard project, Eclipse auto-generates its own Makefile (it is stored in the project's Debug folder), while in a Makefile-project, the programmer must supply their own Makefile. Since TSGL is a non-standard graphics library, we have supplied the Makefile to inform the C++ compiler (g++) of the location of tsgl.h and the TSGL binary library.
Take a moment to view the program in main.cpp. Note that it currently just constructs an ImageConverter object and then sends that object the run() message:
/* main.cpp is a driver for an ImageConverter program
* using OpenMP to parallelize the image processing
* and TSGL to view the processing in near real time.
*
* Author: Joel Adams, for CS 112 at Calvin College.
* Revised for TSGL-2: November 2020.
*/
#include "ImageConverter.h"
int main() {
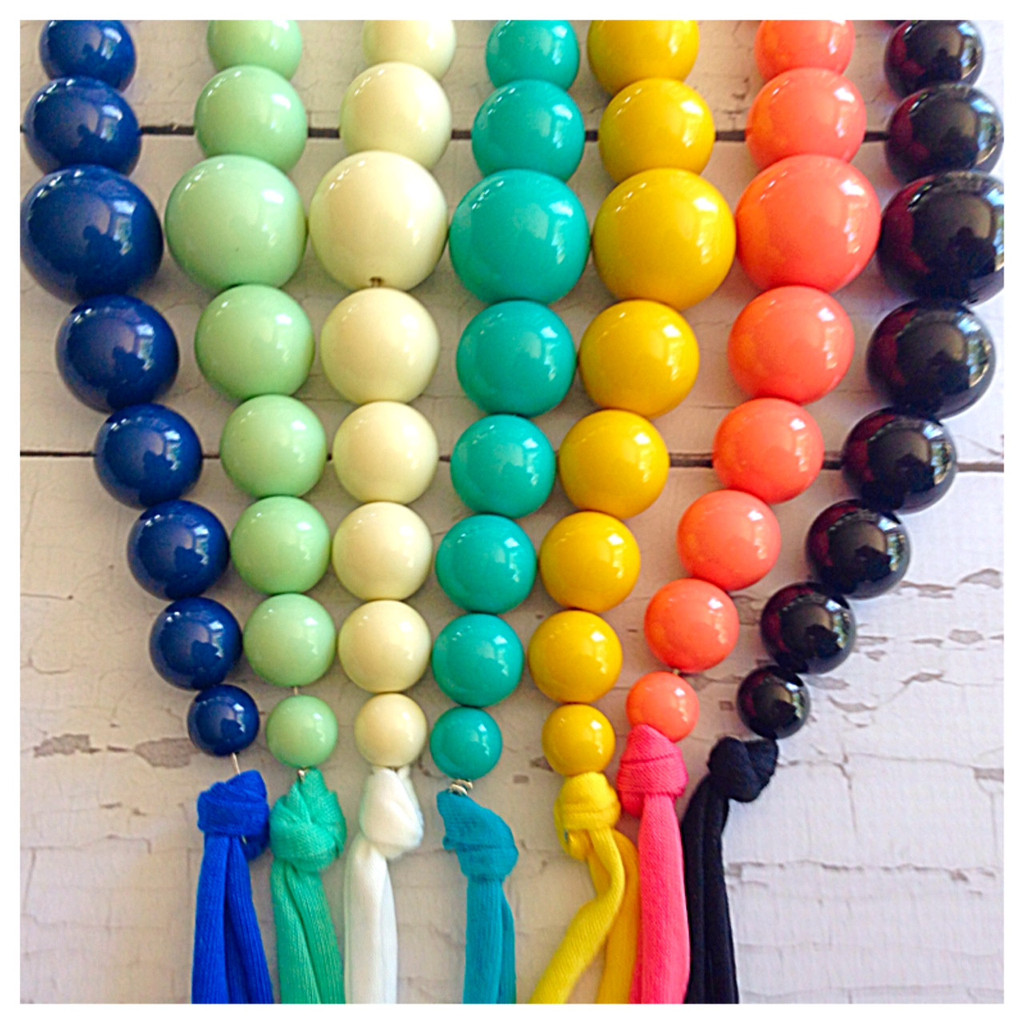
ImageConverter iConverter("./pics/beads.jpg", 800, 800);
iConverter.run();
}
This call to the ImageConverter constructor creates an 800x800
Canvas object and loads an image
from the specified file into that object.
Build and run the program, and verify that it displays
a Canvas object containing
the following picture of beads of various colors:
Click the "close box" on each Canvas object's frame (or press Escape), and then continue.
In the file ImageConverter.h, note that so far, class ImageConverter has three methods and four instance variables:
class ImageConverter {
public:
    ImageConverter(const std::string& imageFileName, int width, int height);
    ~ImageConverter();
    void run();

private:
    Canvas      myCanvas0;
    int         myWidth;
    int         myHeight;
    string      myImageFileName;
};
The first two methods allow us to construct an ImageConverter object
from a given image file, and clean up at the end of its lifetime.
The third method provides the application's functionality to perform image conversions.
The four instance variables provide a Canvas in which the image will be displayed,
the desired width and height of the Canvas,
and a string in which the name of the image file is stored.
The Canvas class is declared in a graphics library developed at Calvin called TSGL, which stands for "thread safe graphics library". Unlike other graphical libraries, TSGL permits different threads to draw to the same graphical canvas at the same time, and displays the results in approximate real-time, which is ideal for today's exercise.
In the file ImageConverter.cpp, locate the ImageConverter constructor:
 ImageConverter::ImageConverter(const std::string& imageFileName, int width, int height)
  : myCanvas0(0, 0, width, height, imageFileName),
    myWidth(width),
    myHeight(height),
    myImageFileName(imageFileName)
 {
     myCanvas0.start();
     myCanvas0.getBackground()->drawImage(0, 0, 0, imageFileName,
                                          width, height, 0, 0, 0);
 }
As can be seen above, this constructor has 3 parameters: the name of the image file, and the desired width and height for the Canvas in which to display the image. Using these 3 parameters, the constructor initializes a Canvas object, and then saves the parameter values in the instance variables: myWidth, myHeight, and myImageFileName. All of this happens in the constructor's initialization-list area, which provides an alternative way of initializing a class's instance variables. The initializations in this initialization-list area are performed before the body of the constructor executes, so if the body depends on any of those initial values, this provides a means of ensuring that they have been stored.
The body of the constructor sends myCanvas0 the start() message, which activates that Canvas and makes it appear on screen. It then sends myCanvas0 the getBackground() message, which returns a pointer to the Canvas's background (kind of like the backdrop in a play), and then sends the background the drawImage() message, with the arguments that method requires to read and display the image from fileName. The drawImage() method uses a separate thread to load and display the image asynchronously from the main thread, so the final line of the constructor invokes the sleep() system call to put the main thread to sleep for a second, in order to give the second thread time to finish loading and displaying the image on myCanvas0 before continuing.
Next, find the definition of the ImageConverter destructor in ImageConverter.cpp:
 ImageConverter::~ImageConverter() {
       cout << "\nImageConverter terminated normally." << endl;
 }
In main.cpp, at the end of our ImageConverter
object's scope, this destructor is invoked (invisibly).
Since our class contains no pointer instance variables,
there is no dynamic memory to deallocate,
so the destructor just displays a "normal termination"
feedback message for the user.
Next, find the definition of the run() method:
  void ImageConverter::run() {
   //    invertImage();
       myCanvas0.wait();
  }
This method is where we will invoke a separate
invertImage() method, which is currently commented out.
When that method terminates,
it sends the wait() message to the Canvas instance
variable myCanvas0.
This message causes myCanvas0 to pause
until the user clicks the window's close box
or presses the Escape key while the window has mouse-focus.
The rules for using a TSGL Canvas include:
Now that we have seen how the ImageConverter constructor, destructor, and run() methods work, let's proceed to our image inversion operation. The inverse of a color image (or the negative of a black and white image) is just the inverse of each of its pixels. That is, we can compute the inverse of an image by iterating through its pixels and computing the inverse of each pixel, using the following pseudocode steps:
    color = canvas0.getPixel(row,col);
    invertedR = 255 - color.R;
    invertedG = 255 - color.G;
    invertedB = 255 - color.B;
    invertedColor = RGB_Color(invertedR, invertedG, invertedB);
    canvas1.setPixel(row, col, invertedColor);
To illustrate, these steps will convert a pixel that is colored:
 void ImageConverter::invertImage() {
     Canvas canvas1(myWidth+50, 0, myWidth, myHeight,
		     myImageFileName+"-inverted");
     canvas1.start();

     Background * background0 = myCanvas0.getBackground();
     Background * background1 = canvas1.getBackground();

     const int WIN_WIDTH  = myCanvas0.getWindowWidth(),
               WIN_HEIGHT = myCanvas0.getWindowHeight(),
               START_X    = -WIN_WIDTH / 2,            // left column
               START_Y    = -WIN_HEIGHT / 2,           // bottom row
               STOP_X     = +WIN_WIDTH / 2,            // right column + 1
               STOP_Y     = +WIN_HEIGHT / 2;           // top row + 1

     // loop through the image rows
     for (int y = START_Y; y < STOP_Y; ++y) {          // bottom to top
          // loop through the image columns
          for (int x = START_X; x < STOP_X; ++x) {      // left to right
              // read the pixel at canvas0[row][col]
              ColorInt pixelColor = background0->getPixel(x, y);
              // compute its inverse
              int invertedR = 255 - pixelColor.R;
              int invertedG = 255 - pixelColor.G;
              int invertedB = 255 - pixelColor.B;
              ColorInt invertedColor(invertedR, invertedG, invertedB);
              // draw the inverse at the same spot in canvas1
              background1->drawPixel(x, y, invertedColor);
           } // inner for
           // slow the processing to simulate a very large image
           canvas1.sleep();
      } // outer for

      canvas1.wait();
 } // invertImage
You will also need to add a prototype for this method to the
ImageConverter class in ImageConverter.h.
This method creates a new, local Canvas object named canvas1, starts it, sets up pointer variables to each Canvas's Background. Since the origin (0,0) for a Background is the center of the screen, the method then computes the starting and stopping points for the nested for loops that invert the image as follows: for each pixel in the image from the Background of myCanvas0, reads the pixel, computes its inverse, and then draws the inverted pixel on the Background of canvas1. Once it is done drawing, this second Canvas waits for the user to click the close-box or press Escape.
In TSGL, RGB colors are represented using the ColorInt type, as can be seen in the declaration of the pixelColor and invertedColor variables within the invertImage() method.
Testing invertImage(). Uncomment the call to invertImage() in the run() method within ImageConverter.cpp. Then save all changes, rebuild your program, run it, and verify that it correctly produces an inverted version of the beads.jpg image. Thanks to our use of TSGL, you should see the program's single thread drawing the inverted image from bottom to top as invertImage() runs.
Note that this image is an 1024x1024 (1 megapixel) image, but our main() function tells the ImageConverter to down-scale it to 800x800, in order to fit our screens. Unlike a larger (e.g., 120 megapixel) image, the processing of such a small image will happen too fast for us to see the thread drawing it, so our invertImage() method uses a sleep() call after each row is drawn, to slow the processing sufficiently for us to see the drawing. Using the Canvas::sleep() method this way lets us process an image that fits on our screen, but simulates how long it would take our program to process a much larger image.
Find the statement in invertImage() that constructs canvas1. Feel free to experiment with the arguments to see how changing them affects the construction of canvas1.
Timing invertImage(). To determine how long this operation is taking, modify invertImage() so that it appears as follows:
 void ImageConverter::invertImage() {
      // record starting time
      double startTime = omp_get_wtime();

      Canvas canvas1(myWidth+50, 0, myWidth, myHeight,
                     myImageFileName+"-inverted");
      canvas1.start();
      Background * background0 = myCanvas0.getBackground();
      Background * background1 = canvas1.getBackground();

      const int WIN_WIDTH  = myCanvas0.getWindowWidth(),
                WIN_HEIGHT = myCanvas0.getWindowHeight(),
                START_X    = -WIN_WIDTH / 2,            // left column
                START_Y    = -WIN_HEIGHT / 2,           // bottom row
                STOP_X     = +WIN_WIDTH / 2,            // right column + 1
                STOP_Y     = +WIN_HEIGHT / 2;           // top row + 1

      // loop through the image rows
      for (int y = START_Y; y < STOP_Y; ++y) {          // bottom to top
          // loop through the image columns
          for (int x = START_X; x < STOP_X; ++x) {      // left to right
              // read the pixel at canvas0[row][col]
              ColorInt pixelColor = background0->getPixel(x, y);
              // compute its inverse
              int invertedR = 255 - pixelColor.R;
              int invertedG = 255 - pixelColor.G;
              int invertedB = 255 - pixelColor.B;
              ColorInt invertedColor(invertedR, invertedG, invertedB);
              // draw the inverse at the same spot in canvas1
              background1->drawPixel(x, y, invertedColor);
           } // inner for
           // slow the processing to simulate a very large image
           canvas1.sleep();
      } // outer for

      // compute and display the time difference
      double totalTime = omp_get_wtime() - startTime;
      cout << "\n\nImage inversion took "
            << totalTime << " seconds.\n" << endl;

      canvas1.wait();
 } // invertImage
The omp_get_wtime() function returns the number of seconds
that have elapsed since the program began running.
By calling and storing its value before the nested loops,
and then calling it again after the nested loops,
we can compute the difference in the two times,
which will be the time our program has spent inverting the image.
With that change made, rebuild and rerun your program. The time required to perform this operation should now appear in your console. Compare the value you see with one of your neighbors; your times should be fairly close to one another.
Using a spreadsheet program (e.g., a Google Sheet), open up a spreadsheet. On its first row, place a descriptive title (e.g., CS 112 Lab 10: Image Inversion, ...) Be sure to include your name and the date.
Beneath that, make two column-headings: one labeled NumThreads and one labeled Time. Since we used 1 thread just now, enter a 1 under NumThreads; under Time, enter the time from the Eclipse console.
Now that we have recorded the time required to invert the image sequentially, we are ready to "parallelize" this operation. We will do this in two steps:
1. Modifying main(). There are several ways to control the number of threads OpenMP uses for parallel processing:
 #include "ImageConverter.h"

 int main() {
      omp_set_num_threads(1);
      ImageConverter iConverter("pics/beads.jpg", 800, 800);
      iConverter.run();
 }
We will start with 1 thread, to ensure that our modifications
will not "break" our program if a single thread is used.
However, by changing the argument to omp_set_num_threads(), we can easily control the number of threads OpenMP will use. That will let us see how varying the number of threads affects the time required to process our image.
2. Modifying invertImage(). If a loop's iterations are independent of one another, OpenMP makes it easy to spread the iterations of that loop across different threads.
Modify the body of invertImage() by inserting the #pragma directive shown below:
 void ImageConverter::invertImage() {
     // record starting time
     double startTime = omp_get_wtime();

     Canvas canvas1(myWidth+50, 0, myWidth, myHeight,
                    myImageFileName+"-inverted");
     canvas1.start();
     Background * background0 = myCanvas0.getBackground();
     Background * background1 = canvas1.getBackground();

     const int WIN_WIDTH  = myCanvas0.getWindowWidth(),
               WIN_HEIGHT = myCanvas0.getWindowHeight(),
               START_X    = -WIN_WIDTH / 2,            // left column
               START_Y    = -WIN_HEIGHT / 2,           // bottom row
               STOP_X     = +WIN_WIDTH / 2,            // right column + 1
               STOP_Y     = +WIN_HEIGHT / 2;           // top row + 1

     // loop through the image rows
     #pragma omp parallel for
     for (int y = START_Y; y < STOP_Y; ++y) {          // bottom to top
         // loop through the image columns
         for (int x = START_X; x < STOP_X; ++x) {      // left to right
             // read the pixel at canvas0[row][col]
             ColorInt pixelColor = background0->getPixel(x, y);
             // compute its inverse
             int invertedR = 255 - pixelColor.R;
             int invertedG = 255 - pixelColor.G;
             int invertedB = 255 - pixelColor.B;
             ColorInt invertedColor(invertedR, invertedG, invertedB);
             // draw the inverse at the same spot in canvas1
             background1->drawPixel(x, y, invertedColor);
          } // inner for
          // slow the processing to simulate a very large image
          canvas1.sleep();
     } // outer for

     // compute and display the time difference
     double totalTime = omp_get_wtime() - startTime;
     cout << "\n\nImage inversion took "
           << totalTime << " seconds.\n" << endl;

     canvas1.wait();
 } // invertImage
A #pragma directive is a suggestion to the C/C++ compiler.
In the case of our directive:
#pragma omp parallel forif the compiler does not support OpenMP, then it will ignore this suggestion but still compile your program. However, if the compiler does support OpenMP, then the directive is a very strong suggestion to the compiler that:
Note that in order for this to work, OpenMP must give each thread its own private copy of the loop-variable y, or else the two threads may conflict with one another when their loops perform ++y. In fact, OpenMP gives each thread its own copy of any variable declared within the loop. By contrast, any variable declared before the #pragma directive is shared among the threads, which can cause conflicts.
Testing. Having made these changes, rebuild and rerun your program. You should still see a single thread processing the image from bottom to top, because we only told OpenMP to use 1 thread to process the image. Verify that the resulting image is still correctly inverted before continuing.
Timing. Back in main.cpp, change the argument to omp_set_num_threads() from 1 to 2. The rebuild and rerun your program. Instead of a single thread, you should now see two threads working in tandem, each processing one half of the image in a top-down fashion.
When the threads have finished, the time they took to process the image should appear in your console, as before. (This should be less than the time required by the sequential (single-threaded) approach.) Record this number of threads and the time in your spreadsheet.
Varying the Number of Threads. Next, we want to see how long it takes to process our image using 4, 6, 8, 10, 12, 14, and 16 threads.
In main.cpp, change the argument to omp_set_num_threads() from 2 to 4. Then rebuild and rerun your program. You should now see four threads working and processing their quarters of the image in parallel. When they have finished, record the number of threads and the time in your spreadsheet. (This should be less than the time of the 2-thread approach.)
Then repeat this procedure for 6, 8, 10, 12, 14, and 16 threads, using the spreadsheet to record the processing time for each the number of threads.
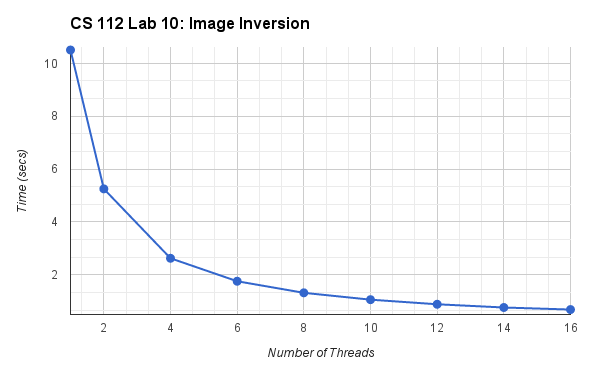
Visualizing the Improvement. In your spreadsheet, create a line-chart that shows the relationship between the number of threads being used and the time required to invert the image. Put Time on the Y-axis and Number of Threads on the X-axis. Be sure to label your chart and axes (including units); here is one I created using Google's spreadsheet program:
Saving the Inverted Image. Saving an image isn't necessary for parallel execution. But if we have gone to the trouble of creating a cool transformation of an image, we may want to save the result. One way to do this is using TSGL's Canvas::takeScreenShot() method. When sent to a Canvas object, this message dumps a portable-network-graphics-formatted (.png) copy of the Canvas into the current folder/directory. We can thus save the result of our conversion by tweaking the invertImage() method as follows:
 void ImageConverter::invertImage() {
     // record starting time
     double startTime = omp_get_wtime();

     Canvas canvas1(myWidth+50, 0, myWidth, myHeight, myImageFileName + " Inverted");
     canvas1.start();
     Background * background0 = myCanvas0.getBackground();
     Background * background1 = canvas1.getBackground();

     const int WIN_WIDTH  = myCanvas0.getWindowWidth(),
               WIN_HEIGHT = myCanvas0.getWindowHeight(),
               START_X    = -WIN_WIDTH / 2,            // left column
               START_Y    = -WIN_HEIGHT / 2,           // bottom row
               STOP_X     = +WIN_WIDTH / 2,            // right column + 1
               STOP_Y     = +WIN_HEIGHT / 2;           // top row + 1

     // loop through the image rows
     #pragma omp parallel for
     for (int y = START_Y; y < STOP_Y; ++y) {          // bottom to top
         // loop through the image columns
         for (int x = START_X; x < STOP_X; ++x) {      // left to right
             // read the pixel at canvas0[row][col]
             ColorInt pixelColor = background0->getPixel(x, y);
             // compute its inverse
             int invertedR = 255 - pixelColor.R;
             int invertedG = 255 - pixelColor.G;
             int invertedB = 255 - pixelColor.B;
             ColorInt invertedColor(invertedR, invertedG, invertedB);
             // draw the inverse at the same spot in canvas1
             background1->drawPixel(x, y, invertedColor);
          } // inner for
          // slow the processing to simulate a very large image
          canvas1.sleep();
     } // outer for

     // compute and display the time difference
     double totalTime = omp_get_wtime() - startTime;
     cout << "\n\nImage inversion took "
           << totalTime << " seconds.\n" << endl;

      //save converted image
      canvas1.takeScreenShot();

      canvas1.wait();
 } // invertImage
Make this change.
Then rebuild and rerun your program.
A file with a cryptic name like Image000079.png
should appear in your project folder.
(You may have to rightclick > Refresh
your project folder -- or press F5 -- to see it.)
You can view this image from with Eclipse by using
rightClick > Open with > Other... > Internal Web
Browser,
or from within your regular web browser by choosing
File > Open file... and navigating to
your project folder and selecting this file.
Using either approach, verify that this bitmap file contains a copy of the converted image, before continuing.
When you have verified that the takeScreenShot() method is working correctly, comment out that line (so that we don't continue taking screenshots every time we run the program), and then continue.
How Does OpenMP Do It?.
We just saw that OpenMP makes it easy to "parallelize" the iterations of a loop. However in making it so easy, it hides most of the details as to how it accomplishes this. There are different ways that a loop's iterations can be "parallelized", including:
Parallel Blocks.
OpenMP has a #pragma omp parallel directive that is simpler and more general than the #pragma omp parallel for directive. Using four threads, it behaves as follows:
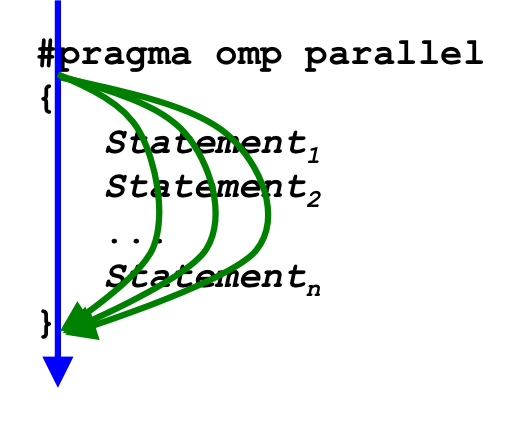
That is, when the flow of execution reaches a #pragma omp parallel directive,
it launches additional threads (as described previously), and
each thread performs the block of statements that follow the directive.
For this reason, this combination of directive and block is sometimes
called a parallel block.
(The #pragma omp parallel for directive that we used previously is a special case of the more general #pragma omp parallel directive. When the for is present in the pragma, the next statement following the directive must be a for loop, instead of a block.)
Using a parallel block, we can implement either approach to loop parallelization.
The simpler "chunk-size 1" approach is shown below.
 void ImageConverter::invertImage2() {
    // record starting time
     double startTime = omp_get_wtime();

    Canvas canvas2(myWidth+50, 0, myWidth, myHeight,
		    myImageFileName + " Inverted, Chunk-Size 1");
    canvas2.start();
    Background * background0 = myCanvas0.getBackground();
    Background * background2 = canvas2.getBackground();

    const int WIN_WIDTH  = myCanvas0.getWindowWidth(),
              WIN_HEIGHT = myCanvas0.getWindowHeight(),
              START_X    = -WIN_WIDTH / 2,
              START_Y    = -WIN_HEIGHT / 2,
              STOP_X     = +WIN_WIDTH / 2,
              STOP_Y     = +WIN_HEIGHT / 2;

    // launch additional threads
    #pragma omp parallel
    {
       // how many workers do we have?
       unsigned numThreads = omp_get_num_threads();
       // which one am I?
       unsigned id = omp_get_thread_num();

       // loop through the image rows
       for (int y = START_Y + id; y < STOP_Y; y += numThreads) {
            // loop through the image columns
            for (int x = START_X; x < STOP_X; ++x) {
               // read the pixel at canvas0[row][col]
               ColorInt pixelColor = background0->getPixel(x, y);
               // compute its inverse
               int invertedR = 255 - pixelColor.R;
               int invertedG = 255 - pixelColor.G;
               int invertedB = 255 - pixelColor.B;
	       ColorInt invertedColor(invertedR, invertedG, invertedB);
               // draw the inverse at the same spot in canvas2
               background2->drawPixel(x, y, invertedColor);
            } // inner for
            // slow the processing to simulate a very large image
            canvas2.sleep();
         } // outer for
      } // #pragma omp parallel

        // compute and display the time difference
     double totalTime = omp_get_wtime() - startTime;
     cout << "\n\nImage inversion took "
           << totalTime << " seconds.\n" << endl;

     canvas2.wait();
 } // invertImage2
Take a moment to copy this definition into ImageConverter.cpp,
below the definition of invertImage().
You will also need to declare a prototype for this method in the
ImageConverter class.
How It Works. To see how this approach works, suppose that main.cpp contains omp_set_num_threads(4), so the #pragma launches four threads.
unsigned numThreads = omp_get_num_threads();
For each thread, the omp_get_num_threads() function returns the same value
(4), so following this, numThreads == 4 for all four threads.
unsigned id = omp_get_thread_num();
When each thread performs this statement, the omp_get_thread_num()
returns a different value, namely the id number for that thread.
In the parent thread, the function returns 0; in the first child thread,
the function returns 1; in the second child thread, the function returns 2;
and in the final child thread, the function returns 3.
Using n threads, the omp_get_thread_num() function
will return n different values, ranging from 0 to n-1.
So following this statement, the variable id will have a
different value in each thread.
for (unsigned y = START_Y + id; y < STOP_Y; y += numThreads)
Since each thread has a different value in variable id,
each thread starts at a different row of the image.
And since each adds numThreads (e.g., 4) to variable y
after each loop iteration:
Testing. In ImageConverter.cpp, add a call to invertImage2(), below the call to invertImage() in the run() method. Then rebuild and run the program, and compare the behavior produced by the two methods.
Since the number of available cores varies from computer to computer, it is important for parallel operations to run correctly regardless of the number of available cores. On the software side, the operation needs to produce correct results regardless of whether one or many threads are being used.
Try this approach using 1, 2, 4, 6, 8, 10, 12, 14, and 16 threads, and verify that it correctly processes the image for each value. Then answer the following question in your spreadsheet:
Discuss your answer with your neighbor, then continue.
Now that we have compared the #pragma omp parallel for approach and the "Chunk-Size 1" approach, let's examine a different approach we will call "Equal-Sized Chunks". This approach divides the loop's iterations into equal-sized chunks, and gives each thread one of those chunks to process. One way to do this is shown below:
 void ImageConverter::invertImage3() {
    // record starting time
     double startTime = omp_get_wtime();

     Canvas canvas3(myWidth+50, 0, myWidth, myHeight,
		     myImageFileName + " Inverted, Equal-Sized Chunks ");
     canvas3.start();
     Background * background0 = myCanvas0.getBackground();
     Background * background3 = canvas3.getBackground();

     const int WIN_WIDTH  = myCanvas0.getWindowWidth(),
               WIN_HEIGHT = myCanvas0.getWindowHeight(),
               START_X    = -WIN_WIDTH / 2,
               START_Y    = -WIN_HEIGHT / 2,
               STOP_X     = +WIN_WIDTH / 2,
               STOP_Y     = +WIN_HEIGHT / 2;

     // launch additional threads
     #pragma omp parallel
     {
         // how many workers do we have?
         unsigned numThreads = omp_get_num_threads();
         // which one am I?
         unsigned id = omp_get_thread_num();

         // compute this thread's chunk size (iterations % numThreads may != 0)
	 //  giving any 'leftover' iterations to the final thread
         double iterations = STOP_Y - START_Y;
         unsigned chunkSize = (unsigned)ceil(iterations / numThreads);

         // compute this thread's starting and stopping index values
         int start = id * chunkSize + START_Y;
         int stop = 0;
         if (id < numThreads-1) {
             stop = start + chunkSize;
         } else {
             stop = STOP_Y;
         }

         // loop through image rows in equal-sized chunks
         for (int y = start; y < stop; ++y) {
            // loop through the image columns
            for (int x = START_X; x < STOP_X; ++x) {
               // read the pixel at canvas0[row][col]
               ColorInt pixelColor = background0->getPixel(x, y);
               // compute its inverse
               int invertedR = 255 - pixelColor.R;
               int invertedG = 255 - pixelColor.G;
               int invertedB = 255 - pixelColor.B;
       	       ColorInt invertedColor(invertedR, invertedG, invertedB);
               // draw the inverse at the same spot in canvas3
               background3->drawPixel(x, y, invertedColor);
            } // inner for
            // slow the processing to simulate a very large image
            canvas3.sleep();
         } // outer for
     } // #pragma omp parallel

            // compute and display the time difference
     double totalTime = omp_get_wtime() - startTime;
     cout << "\n\nImage inversion took "
           << totalTime << " seconds.\n" << endl;


     canvas3.wait();
 } // invertImage3
Take a moment to copy this definition into
ImageConverter.cpp, and add its prototype to the
ImageConverter class.
You may also need to #include <cmath>
in order for the ceil() function to be defined.
How It Works. To see how this approach works:
      double iterations = STOP_Y - START_Y;
      unsigned chunkSize = (unsigned)ceil(iterations / numThreads);
In our example, iterations is the number of rows in the image (800),
so each thread computes 800 / 4 = 200 as the value of chunkSize.
unsigned start = id * chunkSize + START_Y;
In our four-thread scenario where chunkSize is 200:
     unsigned stop = 0;
     if (id < numThreads-1) {
         stop = start + chunkSize;
     } else {
         stop = STOP_Y;
     }
In this step, all threads except the final thread stop processing
when they reach start of the next thread's chunk. Thus:
(If the number of iterations is not evenly divisible by the number of threads, then this if statement keeps the final thread from going out of bounds. For example, if our image had 799 rows instead of 800, the if statement would ensure that thread 3 stops after it finishes processing row 798.)
for (int y = start; y < stop; ++y) {
In this loop, each thread starts processing the row
at its start index value,
and iterates through consecutive rows
until it reaches its stop index value. Add a call to invertImage3() to the run() method, below the calls to invertImage() and invertImage2().
Testing and Visualization. Rebuild and run your program, using 1, 2, 4, 6, 8, 10, 12, 14, and 16 threads, and verify that it correctly processes the image for each value. Then answer the following question in your spreadsheet:
Discuss your answers with your neighbor, then continue.
Other Images. There are other image files in the pics folder that you downloaded with the tarball. As time permits, feel free to experiment with some of these other images to verify that your operations work on them, too. (The file colorfulCars.jpg has especially nice colors.)
In image processing methods like inversion, each thread is accessing a group of pixels that is distinct from the pixels being accessed by the other threads.
For example, if we process an image using invertImage() and two threads, thread 0 processes the top half of the image, and thread 1 processes the bottom half of the image. Since there is no overlap in the pixels each thread is processing. each thread can process its part of the image without any interference from other threads.
Problems like this -- where the nature of the problem is such that each thread can solve its piece of the problem without having to interact with other threads -- are called embarrassingly parallel problems. Not that there is anything embarrassing about the problems; these are just the easiest kind of problem to solve in parallel -- so easy that it would be embarrassing to still solve them sequentially, once we know about parallelism! To avoid this confusion, some people call these kinds of problems perfectly parallel problems instead.
Not all problems are perfectly/embarrassingly parallel. A problem might require one thread to read a variable's value at the same time as another thread might be writing to that same variable, or for two threads to write to the same variable. In problems like this, the accesses to those variable-values must be synchronized, or the results are non-deterministic (i.e., unpredictable). This is generally a Bad Thing for a computer program.
If a program contains unsynchronized accesses to the same variable, computer scientists say the program contains a race condition or data race, because the threads can be thought of as "racing" to access the shared variable's data values, and the result of the computation can be different, depending on which thread wins/loses the race. Dealing with race conditions generally makes parallel programming more challenging than the simple example we have explored today.
Image processing is an ideal first problem for learning about parallelization, because it lets us focus on the parallel concepts without the complications of race conditions. However many (most?) problems are not so easily solved, so don't leave today's exercise with the impression that parallel computing is always this easy!
Make sure your spreadsheet is saved in your project folder, in an Excel-compatible format (.xls). I recommend the 97/2000/XP format, as it seems to work well.
Then copy your project to a new /home/cs/112/current/yourUserName/lab10 folder.
If you have time, you may wish to read over and begin work on this week's project, which is the final project for this course.