
In today's lab, and in subsequent labs, you will work in pairs in a style called "pair programming". This technique is used in progressive software development companies because it has been found to increase productivity, correctness, and comraderie among the developers. Code written using this technique is more often correct the first time, and debugging goes faster.
In pair programmer, there are two roles, driver and navigator. The driver sits at the keyboard and does the typing. However, the driver writes code at the direction of the navigator. The navigator tells the driver what to type, or at least, what the next line of code should do. Together, they discuss whether the logic is correct, whether the syntax is correct, etc.
You know that pair programming is going well when there is talking going on. There should always be conversation happening. If it is quiet between the pair, there is a problem. When working on a lab, the navigator will read the lab out loud.
Every 20 or 30 minutes, the pair should switch roles -- but still work on the same machine. When the pair is done, there is one copy of the code -- not two. Submit this one copy AND MAKE SURE BOTH STUDENTS' NAMES ARE ON IT. As projects are generally based on the labs, you'll need to send the code to the other person. It is probably easiest to do this by attaching each file to an email, or zip up all the files and send that zip file to the other person.
In last week's exercise, we built a simple but useful vector class named Vec, that stored real (i.e., double) values. To make it easy to change the type of items stored in our Vec, we used a typedef of the form:
typedef double Item;We then meticulously used the name Item everywhere we would have used the type double. By doing so, a user wanting to use a vector of integers could just modify the typedef:
typedef int Item;recompile, and our Vec would be a vector of integers!
This approach works fine for simple problems where all of the vectors store the same types of values. However suppose you need vectors of both integer and real items (or some other type of item) in the same program? In this situation, the typedef approach cannot help us -- we need a different approach.
Part I of today's exercise is to convert our Vec class into a generic container -- a container capable of storing any type of item. To do so in C++, we convert the Vec class into a class template. Because we have used the typedef-Item approach to define our Vec class, this conversion is fairly simple.
In Part II of today's exercise, we will use the Vec template from Part I to build a Matrix class, capable of storing 2-dimensional vectors.
To get started, create a new project for this week's lab. Then download and import this revised version of VecTester.cpp and tester.cpp into this project. Take a moment to compare the test-methods in this version of VecTester.cpp to those in the version we used last week, to see just how they differ.
VecTester.h requires no changes from last week, so after you see how they are different, import VecTester.h, Vec.h and Vec.cpp from last week's project into this new project. The test-methods in the provided VecTester.cpp have been revised to use a Vec template. You will be changing Vec.h and Vec.cpp in today's exercise.
You will also need to import the text files vecTest.1.txt and vecTest2.txt from last week's project into this project, so take a moment to do so.
As its name suggests, a class template is a plan or blueprint from which the compiler can build a class. Once we have converted our Vec class into a Vec<Item> template, a user of the class will be able to write:
   Vec<int> v1;
   Vec<double> v2;
   Vec<string> v3;
Given these declarations, the C++ compiler will use the Vec<Item> template to build three classes:
The compiler will use these behind-the-scenes classes as the types of v1, v2, and v3. For every declaration in which we pass a new type into the template, the compiler will build a new class, and then use that class as the declaration's type.
With that as our introduction, let's get on with turning our Vec class into a Vec<Item> class template.
   template<class Item>
   class Vec {
       ...
   };
This revised declaration tells the C++ compiler that
It is worth mentioning that the name Item is an identifier we have chosen, since it is what we used for our typedef. The words template and class are C++ keywords, they cannot be changed.
Once this declaration has been processed, the name of the template is Vec<Item>.
Because the C++ compiler uses a template as a blueprint from which it builds a class, the compiler needs to be able to see the entire class -- class declaration plus method definitions --- when a program using the template is compiled. This means that the entire class template -- template declaration plus method definitions -- must appear in the header file, in order for a program that #includes the header file to compile, or linking errors will occur. So our next step is to select the method definitions in the implementation file, cut them, and paste them into the header file, between the end of the class declaration and the #endif.
In Vec.cpp, select all of the method definitions. Then use Edit > Cut (or Ctrl-x) to cut them from the .cpp file. Switch to the Vec.h, move the cursor to a point between the end of the class declaration and the #endif, and use Edit > Paste (or Ctrl-v) to paste the method definitions.
If there are #include directives in the Vec.cpp file that are not in Vec.h (except for Vec.h itself), they will also need to be cut-and-pasted into Vec.h. (It is often necessary to cut-and-paste #include<fstream>.)
Now that the method definitions have been moved from Vec.cpp to Vec.h, you can delete Vec.cpp from your project.
NOTE: at this point the code will not compile correctly. That's OK.
We now have a class template, but our methods are still class methods. Our next step is to convert each class method into a template method. Test-driven development gives us a systematic, method-by-method means of doing this conversion, without getting overwhelmed by a zillion compiler errors.
Begin by commenting out all of the Vec prototypes, and all of the method definitions you just pasted into the header file. If you want to, compile and run your project. You should see the All tests passed! message, because (a) all the test-methods and the class-methods are commented out.
Our test-driven procedure will be to:
So the rest of Part I is to use these steps to convert each of the Vec methods to method-templates.
To illustrate this conversion process, let's run through these steps using some of the Vec constructors.
   template<class Item>
   Vec::Vec() {
      ...
   }
That completes step 1.
For step 2, we replace each use of the name of the class (Vec) that is not the name of an operation with the name of the template (Vec<Item>), as follows:
   template<class Item>
   Vec<Item>::Vec() {
      ...
   }
That's it! Save all changes, and compile and run your project.
If you find errors, find and fix them before continuing.
(Hint: You may need to do the same thing to your destructor
before your program will build.)
Congratulations! You have just converted your first class-method into a method-template!
Using what we just did to the default constructor as a model, uncomment the explicit constructor's test-method definition and call, then convert the explicit constructor into a method-template. Compile and run your project. If errors occur, fix them. When it passes all tests continue.
Note that within this constructor, the allocation of the dynamic array uses Item. Previously, this Item was determined by the typedef declaration; but now, Item refers to the name of our template's parameter. If the user declares:
   Vec<double> v1;
   Vec<int> v2;
then in v1, all of the occurrences of Item will be replaced by double, while in v2, all the occurrences of Item will be replaced by int.
Congratulations! You've just done a method-to-method-template conversion!
   template<class Item>
   Vec<Item>::Vec(const Vec<Item>& original) {
      ...
   }
Note that the type of any Vec parameter or local variable must be replaced by Vec<Item>. This is consistent with our "conversion rule" -- any use of the name of the class that is not the name of an operation (i.e., a constructor or destructor) must be replaced.
Compile and run your project. Continue when it passes all tests.
Now that you know how to do the conversion, we can speed up this mechanical process a bit.
At the destructor definition, comment out the line template<class Item>. Then copy the line //template<class Item> using Edit > Copy (or Ctrl-c). With the remaining operations still commented out, use Edit > Paste (or Ctrl-v) to paste that line at the beginning of each of the remaining operations in the header file.
Return to the destructor's definition and uncomment the line template<class Item> in the destructor. Then copy the "phrase" <Item>. With the remaining operations still commented out, paste this after each use of the name of the class that is not the name of an operation, throughout the rest of the header file.
Then, one untested method at a time:
By using this methodical approach (Ha, ha! Get it?!?), any compilation errors that occur should be confined to the newly uncommented method-template. This will make it easier and faster for you to find and fix the errors.
Use this approach to complete the conversion of class Vec to the template Vec<Item>.
Congratulations! You have just built your first class template!
As you can see, the C++ syntax to build class templates is a bit complicated, and it is quite easy to make syntax errors if you try to build a template container from the outset.. For this reason, we recommend this 2-step approach to building containers:
Because any type can be passed via the template's parameter, a container built as a template can store any kind of value. Because they are defined to store "generic" items, container templates are often called generic containers. The template is the C++ mechanism for building generic containers; other languages (e.g., Ada, Java) provide other (simpler) mechanisms.
Our Vec<Item> data structure is a 1-dimensional structure, whose one dimension is its length or size:
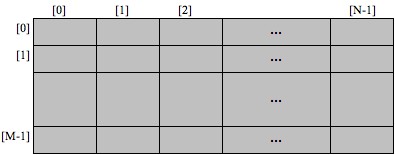
For some kinds of problems, 2-dimensional data structures are convenient:
   VecTester vt;
   vt.runTests();
and uncomment the lines
   MatrixTester mt;
   mt.runTests();
   #ifndef MATRIX
   #define MATRIX

   #include "Vec.h"

   typedef double Item;

   class Matrix {
   public:

   private:
   };

   #endif
Note that we are using our typedef-Item mechanism again.
Later on, this will make it easy for you to turn this class into a template.
Where a Vec had just two things to keep track of (its length/size, and its values), a Matrix has three things to keep track of:
class Matrix {
...
private:
unsigned myRows;
unsigned myColumns;
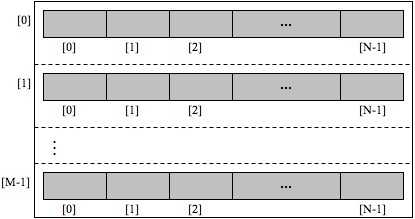
Vec< Vec<Item> > myVec;
};
That is, if a Matrix has-a vector of vectors, then the syntax above lets
us express that relationship in C++.
Note that the spaces surrounding the innermost Vec<Item> are important: if you neglect to leave a space after Vec<Item>, the C++ compiler will see Vec<Item>>, think that >> is operator>>, and get very confused.
As usual, our first operation is the default constructor. In MatrixTester.cpp, uncomment the definition and call to the testDefaultConstructor() method.
Within the declaration of Matrix, add a prototype/declaration for the default constructor. You'll also need to have Matrix name MatrixTester as a friend, as we have done previously.
The default constructor needs to initialize its instance variables. To do so, we can use this definition:
   Matrix::Matrix() {
        myRows = myColumns = 0;
   }
Since a Matrix has-a Vec
of Vecs of Items,
the Vec default constructor is automatically
invoked to initialize myVec.
Place this definition in Matrix.cpp. To pass the default constructor test, you will need to define the (trivial) Matrix methods getRows() and getColumns(). Do so (don't neglect to declare/define these as const methods!); then save everything and test your code. Continue when your default constructor passes its test.
Start by uncommenting the call and definition of testExplicitConstructor() in MatrixTester.cpp. If you examine the test-method, you'll see that we want to be able to pass the Matrix constructor two values:
Given parameters rows and columns, this constructor needs to
   Matrix::Matrix(unsigned rows, unsigned columns) {
            myRows = rows;
            myColumns = columns;
            myVec.setSize(rows);
            for (unsigned i = 0; i < rows; i++) {
                myVec[i].setSize(columns);
            }
   }
After we initialize myRows, myColumns, and myVec to have the right number of rows, we need to set the size of each of our rows to the desired number of columns. The for loop:
   for (unsigned i = 0; i < rows; i++) {
         myVec[i].setSize(columns);
   }
does this for us, using the Vec<Item> template's subscript operator and setSize() method.
(If you have not defined the two (read and write) subscript operators for your Vec<Item> template, you will need to do so. If you do not know how, here is a hint. But try it on your own before you check out the hint.)
Compile and run your tests. Continue when your explicit constructor passes all tests.
In MatrixTester.cpp, uncomment the definition and call to testCopyConstructor(). Look over the test-code. Do you think our Matrix class will pass this test as is?
Save, compile, and run the tests. (You may have to have your Vec<Item> template name the MatrixTester class as a friend.) What happens?
In the test-method, the statements:
   Matrix m2(m1);
   ...
   Matrix m4(m3);
invoke the default copy constructor created by the C++ compiler -- the one that does a bit-by-bit copy. That correctly copies the instance variables myRows and myColumns.
However since myVec is a Vec<Item>, the C++ compiler is smart enough to use the Vec<Item> copy constructor to copy your Matrix class's myVec member.
Since all of the instance variables get copied correctly, we need not define a copy constructor for our Matrix class!
If you think about it, this is consistent with our rule that a copy constructor is only needed in a class that contains instance variables that are pointers. Since our Matrix class does not contain any pointer instance variables, it does not need a copy constructor (or a destructor). Cool, eh?
(If you get errors when you run this test, the likely culprits are your Vec copy constructor (since it is being invoked), or your Vec destructor, which may not be deallocating its dynamic array correctly.)
In general, the compiler will translate an expression like this:
m[r][c]
into an expression like this:
m.operator[](r).operator[](c)
The [r] operation is a message being sent to a
Matrix object, so it needs to be handled by a Matrix method
(i.e., Matrix::operator[]),
and it should return the Vec at row r.
The [c] operation will then be sent to that Vec,
so [c] invokes the Vec subscript operation
(i.e., VecIn our test, we see the expression:
m1[i][j] = i*j;
Here, the phrase m1[i] sends the subscript message [i] to m1, which has no subscript operation. Since m1 has-a Vec<Item> (where Item is another Vec<Item>) we can define the Matrix subscript operation to return the Vec<Item> at index i in myVec. Given such a definition, the phrase m1[i][j] will then send that Vec<Item> the message [j], and it will correctly return the Item at index j in row i.
Similarly, the expression:
assert( m1[i][j] == i*j );
sends m1 the [i] message, which should return the Vec<Item> in myVec whose index is i. The rest of the expression sends that Vec<Item> the [j] message, which returns the Item from that Vec whose index is j. So we need to define both the write and the read versions of the subscript operation.
Thankfully, doing so is quite easy. Look over the test and try it on your own; if you get stuck, here is a hint.
Save/compile, and run your tests. Continue when your class passes all its tests.
In MatrixTester.cpp, uncomment the definition and call to testAssignment(). Look over the test-code. Do you think our Matrix class will pass this test as is?
Save and run the tests. What happens?
In the test-method, the statements:
   m2 = m1;
   ...
   m4 = m3;
invoke the default assignment operator created by the C++ compiler -- the one that does a bit-by-bit copy. Like the default copy constructor, the default assignment operator correctly copies the instance variables myRows and myColumns. To assign myVec, it invokes the Vec<Item> assignment operator, which copies myVec.
Thanks to this, we need not define operator=() in this class!
(If you get an error running this test, the problem most likely lies in your Vec assignment operator. Make certain it is correctly deallocating its dynamic array.)
In MatrixTester.cpp, uncomment the definition and call to testEquality(). Look over the test-code. Do you think our Matrix class will pass this test as is?
Save and run the tests. What happens?
In the test-method, the expressions:
   m2 == m1
   ...
   m4 == m3
invoke an equality operator but C++ does not supply a default equality operation for classes. So let's build it! One way to define this method is as follows:
   bool Matrix::operator==(const Matrix& m2) const {
      if ( myRows != m2.getRows() || myColumns != m2.getColumns() ) {
           return false;
      } else {
           return myVec == m2.myVec;
      }
   }
This definition is this simple because it uses the definition of Vec<Item>::operator==(). That is, we first check the simple case -- mismatches in the rows and columns -- and if there is no mismatch, then we directly compare the equality of myVec and that of m2.
(Note that since Matrix::operator== should not change any of the Matrix instance variables, it is a const method. That means that all of the methods it invokes -- getRows(), getColumns(), and Vec::operator== -- must also be const methods.)
Add this definition to Matrix.cpp and its prototype to Matrix.h. The save/compile and run your tests. Continue when your method passes all of the tests.
Congratulations! You now have a Matrix class that offers the basic functionality required by a matrix.
This week's project is to add a few of more operations, and then convert Matrix to a template.
Copy your project to a new
/home/cs/112/current/yourUserName/lab4 folder.
MAKE SURE BOTH STUDENTS' NAMES ARE IN THE HEADER DOCUMENTATION FOR THE CODE.
If time permits, you may begin working on this week's project.