The purpose of today's lab is to give you familiarity with the
systems we will be using throughout the semester. There are 2
components:
- An introduction to the operating system
- A Python program using turtle graphics
Read the instructions below carefully and complete each tutorial
and exercise as indicated. In this course you will often work as part
of a pair, but for today, please work on your own (asking lots of
questions of those around you!)
Using these Lab Exercises
Please keep the following things in mind as you do the lab
exercises in this course:
- Make a practice of bringing your reference materials to the
lab period (e.g., lecture notes). The lab exercises
reinforce and extend those materials and it’s hard to remember
all the details (even for computing professionals!).
- Get used to asking questions. Ask the students around you;
ask the lab assistants; ask your instructor!
- Experiment with your tools. Experimentation is the best way
to learn how to use them. (We won’t let you break anything!)
- The goal of the lab exercises is understanding not
survival. Don’t just record the answers, make sure that you
understand them!
Operating Systems
To design and implement algorithms on a computer, you must first
know how to control the basic operations of the computer. This is one
of the fundamental purposes of the operating system. Study the
tutorial appropriate for the operating system that you will be using
in these labs (only!). It is important for craftspeople to know their
tools well, so we suggest that you at least review the material even
if you’ve used the system in the past.
- UNIX/Linux -
Introduction
- Windows - We generally assume that you know how to use the
basic Microsoft Windows operations. See the Windows tutorial if you
need a refresher.
- Mac - Here again, we generally assume that you know how to
use the basic Apple operations. See the the appropriate tutorial if
you need a refresher.
Thonny - An Integrated Development Environment
(IDE)
While it is possible to write programs using only simple text
editors, it is often preferable to work within a system specifically
designed for writing code. This is the purpose of an IDE. IDEs usually
provide source code editors (including some built-in features making
it easier to spot syntax errors), the ability to run your code as a
program, and a means of helping to debug your program.
In this course we will start by using the Thonny IDE, and then later we'll switch to using Eclipse with PyDev. Thonny is a very basic IDE that provides many nice features for beginning Python programmers. It is also very easy to download and install on Windows, MacOs, and Linux. And, the basic installation also installs the Python interpreter, so that you don't have to do that separately.
Using what you have learned in the Operating System (Linux,
Windows or Mac) introduction you should now be able to
complete the following exercise:
Exercise 1.1
Do the following things on your development system:
- Open up a Terminal Emulator window (found under the Accessories menu in the Start menu) and create a new directory called
cs108 by typing mkdir cs108. Then do cd cs108 and then mkdir lab01.
- Start up Thonny. You'll see a window titled
<untitled>. In this window, type:
- your full name,
- why you are taking this class, and
- your major (or ones you are considering) together with an
explanation of why you have chosen (or are considering) that
major.
- Save your file (File→Save), changing down to the
cs108/lab01 directory and calling the file aboutMe.txt
- In the terminal window, find your file in the directory system (by typing
cd lab01 (hit "Enter") and then ls) and
verify that it
contains the correct information (by typing cat aboutMe.txt
, which prints the file's contents).
You will submit this file at the end of the lab.
A Python program using turtle graphics
Python is a powerful programming language with many built-in
features and commands. For example, Python gives the programmer the
ability to evaluate mathematical expressions, receive input from the
user, and print values to the console window with basic commands.
More advanced features are also available by making use of previously
created modules, which can be thought of as
collections of code. Today, we will use a module called
turtle
which gives us access to a collection of functions for Turtle
graphics.
Exercise 1.2
-
In Thonny, Open a new file, and then do File→Save as.... and save the file in your lab01 folder with the name exercise2.py
. NOTE: Rules for Python file names:
- Must never contain spaces
- Should start with a lowercase letter
- Should end with
.py
Double check that you named the file correctly.
Copy and paste the following Python code into your
file:
''' A first turtle graphics program
Created Fall 2014
Lab 01
@author: Serita Nelesen (smn4)
'''

# Gain access to the collection of code named "turtle".
import turtle

# Give the name "window" to the screen where the turtle will appear.
window = turtle.Screen()

# Create a turtle and name it bob.
bob = turtle.Turtle()

# Tell bob the turtle to move forward 250 pixels.
bob.forward(250)

# Keep the window open until it is clicked.
window.exitonclick()
-
Click the green arrow button (known as "Run").
Watch the "turtle" draw a line across the screen.
Click anywhere on the screen to close the window.
Take a minute to study this code. At the top, contained within
triple quotes is a “docString”. Every file you ever submit
*must* have such a docstring that includes the following features:
- A one-line description of the purpose of the file.
- An indication of when the file was created.
- An indication of the assignment (e.g., lab01)
- An indication of who has edited the file.
The lines beginning with # are
comments
, that is, information ignored by Python but useful for the
programmer. Good code is always carefully documented. By convention,
comments describe the code that follows.
In the code above we tell Bob the turtle to move forward, but
there are other commands we can give Bob:
bob.backward(distance)
: have the turtle move backward distance pixels
bob.right(angle)
: have the turtle turn right by angle degrees
bob.left(angle)
: have the turtle turn left by angle degreesbob.penup(): have the turtle pull the pen up
(i.e., stop drawing as it moves)bob.pendown(): have the turtle put the pen back
down (i.e., start drawing as it moves)
Do this... 
Let's change the sample code to have the turtle draw a star
instead of a line. You can do this as follows:
Update the doc string at the top of the file to
indicate that this program will draw a star.
Add your name and login id to the list of authors. You can do this
by adding another line below the current authors:
@author: Your name (your login id)
Give the turtle commands that implement the following
algorithm.
- Move forward 250 pixels
- Turn right some number of degrees
- Move forward 250 pixels
- Turn right some same number of degrees
- ... finish the star
Hint: How many degrees are there in a circle? And how many
points in the star?
When your turtle correctly draws a star, make sure to save your
program. Your file is probably is already saved, but it never hurts
to check. You can tell if a file is saved by looking for an asterisk
(*) next to the name of the file in the tab at the top of the screen.
If there is no asterisk, the file has already been saved.
There are many more commands that you can give a turtle. These are
described in the Application Programmer Interface (API) for the
module: Turtle graphics. An API gives
the names of commands that are available in the module, as well as
information about what inputs are required and what outputs can be
expected. The API for all of Python is available here: Python
documentation
Right now, this documentation is probably overwhelming, but as
we proceed through the course you will learn how to use this resource
to find helpful modules, and then how to use those modules
effectively.
Exercise 1.3 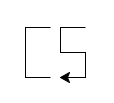
Use what you have learned to have the turtle draw the picture on the
right. Create a new file for this program called
exercise3.py
and include appropriate header documentation. Then implement an
appropriate algorithm, such as the one given here.
- Gain access to the turtle module.
- Create a window and a turtle.
- Have the turtle draw a “C”.
- Pick up the pen.
- Move the turtle to the top of the “S”.
- Put down the pen.
- Have the turtle draw the “S”.
The steps of the algorithm should appear as comments in your
code to help keep track of what is happening where.
Checking In
We will grade these exercises according to the following
criteria:
- Correctness:
- 30% - aboutMe.txt present and complete
- 30% - Drawing a star
- 30% - Drawing “CS”
- Understandability:
- 5% - Header Documentation - Document the code’s basic
purpose, authors and assignment number.
- 5% - Code Documentation - Separate the logical blocks of
your programs with useful comments and white space.
Submit your solutions to these lab exercises using the
appropriate tool.
If you’re working on a lab computer, don’t forget to
log off of your machine when you are finished!