
In the labs so far, you’ve used simple sequences of statements to build your programs. Programming languages provide a richer set of statements to control the flow of execution of your programs. In this lab, we’ll introduce all of the standard control structures and will focus our attention on selection statements.
Simulations are animations that model or mimic real-world phenomena. They can be very useful in engineering and science. For example, we could simulate a falling ball in Processing as follows:
|
|
int width = 150, height = width*2;
int ballRadius = 15;
int currentX = width/2, currentY = ballRadius;
int velocity = 4;

void setup() {
  size(unit, unit*2);
  smooth();
}

void draw() {
  background(200);
  drawBall(currentX, currentY);
  currentY += velocity;
}

void drawBall(int x, int y) {
  fill(255);
  ellipse(x, y, ballRadius*2, ballRadius*2);
}
|
This example presents a sequence of images of the simulation shown here as a set of representative screen captures:
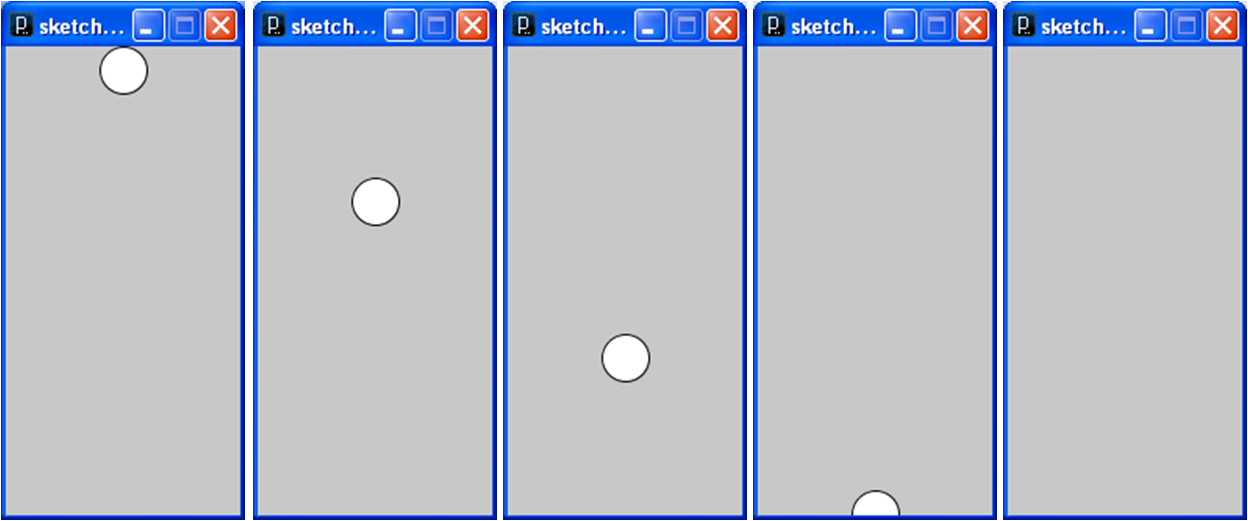
This simulation models a simple ball using the
drawBall() method and models the motion of the ball
by incrementing the y coordinate of the ball’s current
position (currentX, currentY).
This isn’t a particularly satisfying simulation because the ball doesn’t bounce when it hits the ground. To implement a bounce, we need to be able to detect when the ball is at the ground and reverse its direction of motion. This requires the use of selection, one of the basic control structures.
All programming languages provide three basic types of control statements:
It turns out that these three basic control structures - no more no less - allow us to model all symbolic processes. This makes them powerful tools for building programs.
In this sections, we’ll upgrade the falling ball example incrementally.
The trick to bouncing the ball is to detect when the ball
“hits the floor”. This is done using selection, which
is implemented in Processing using the if
statement. This code segment for the draw() method
reverses the direction of the ball and stops its motion.
|
Code:
// Increment the y coordinate (repeated from above).
currentY += velocity;

// Reverse the direction when the ball hits the floor.
if ((currentY + ballRadius) > height) {
  velocity *= -1;
}

// Stop the motion when the ball gets back to the top.
if ((currentY - ballRadius) < 0) {
  noLoop();
}
|
Pattern: if (condition) statement
|
Flowchart: 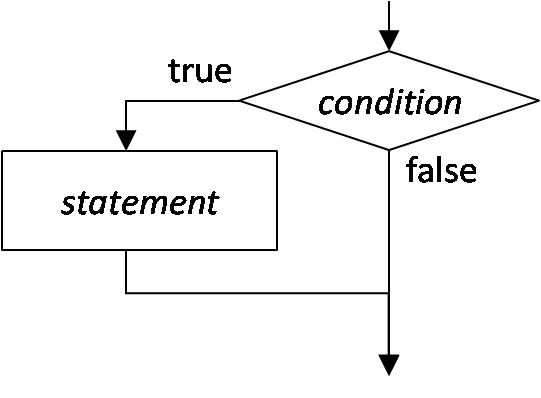
|
This code segment still increments the y coordinate
(currentY) as in the previous example, but it then
checks the location of the ball using the first if
statement. If the ball is at the floor (i.e., when
the current y coordinate plus the radius of the ball are at or
below the bottom of the output window), then the velocity delta is
reversed. This means that the next time around, the y coordinate
will get smaller rather than larger.
The second if statement checks to see if the ball
is back at the top (i.e., when the current y coordinate minus the
radius of the ball is at or above the top of the output
window). It stops the animation at that point using
noLoop().
The ball now bounces, but the velocity and acceleration still feel unnatural. We can improve the simulation by modeling gravitational acceleration. A simple way to do this is to add a gravitational factor into the program that modifies the velocity at each iteration.
y += velocity;
velocity += gravity;
if ((y + ballRadius) > height)
  velocity *= -1;
if ((y-ballRadius) < 0)
  noLoop();
This code segment is identical to the one give above except that it defines a gravitational acceleration constant (0.4 is a good value) and uses this constant to change the speed on each iteration of the simulation. The rest of the code remains the same, so the code adds the constant to the velocity regardless of whether the ball is falling or rising. This speeds the ball up as it falls, and slows it down as it rises.
One final feature we will add to the simulation is repetitive bouncing. As the ball is rising, it will eventually stop rising and start falling again. We can do this by letting ball continue to bounce after it reaches the top of its rise. We add a dampening factor to keep the ball from bouncing forever.
velocity *= -1;
y += velocity;
velocity += gravity;
if ((y + ballRadius) > height)
  velocity *= -1 * dampening;
This code does not have the selection statement that used to stop the simulation at the top of the ball’s rise. It also multiplies the new velocity value by a dampening factor (0.85 is a good value).
drawBall() method with your own figure
method.Selection can also be used to implement choice in mouse-click-based user interfaces. The following example fills in the large box on the right with the color the user chooses by clicking on one of the boxes on the left.
int unit = 100;

void setup() {
  size(unit*3, unit*2);
  fill(0);
  rect(0, 0, unit, unit);
  fill(255);
  rect(0, unit, unit, unit);
}

void draw() {
}

void mousePressed() {
  if (mouseX > 0 && mouseX < unit &&
      mouseY > 0 && mouseY < unit) {
    fill(0);
    rect(unit, 0, unit*2, unit*2);
  } else if (mouseX > 0 && mouseX < unit &&
             mouseY > unit && mouseY >= unit && mouseY < unit*2) {

    fill(255);
    rect(unit, 0, unit*2, unit*2);
  }
}
|
This code segment uses two if statements,
both of which follow the same pattern:
if (booleanExpression)
  statementOrBlock1
else
  statementOrBlock2
}
|
This example presents a sequence of images of the chooser shown here as a set of representative screen captures:
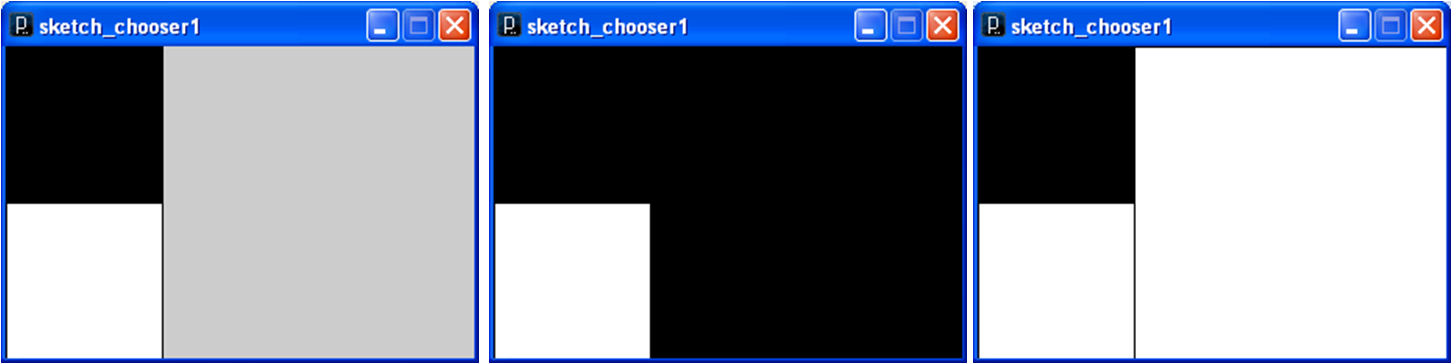
Here, the if statement selects whether to color
the main box black or white, depending upon which
“button” the user clicks on. This is implemented with
an if-else statement. It is possible to nest or chain if-else
statements together as shown in the following code.
if (mouseX > 0 && mouseX < unit && mouseY > 0 && mouseY < unit) {
  fill(0);
  rect(unit, 0, unit*2, unit*2);
} else if (mouseX > 0 && mouseX < unit && mouseY < unit*2) {
  fill(255);
  rect(unit, 0, unit*2, unit*2);
} else {
  fill(200, 200, 200);
  rect(unit, 0, unit*2, unit*2);
}
Here, the final else statement block is a default option for
the selection statement to execute when all the conditions return
false. Note also that the conditions are simplified in this
example; because the first condition is false, the second
condition doesn’t need to re-check to see if mouseY >=
unit as the code in previous example did.

Submit your code for the lab exercises and include a screen capture for each.
