Setting up a Desktop Computer
Before using a computer, you must interconnect the components
appropriately and plug them in to AC power. The basic components
of a computer include:
- Tower - This box contains the key hardware and
software components of the computer (see the list below).
- Video Monitor - This TV-like display device presents
information to the user visually.
- Keyboard - This input device allows the user to enter
text.
- Mouse - The input device allows the user to point to
and move objects around the workspace presented on the video
monitor.
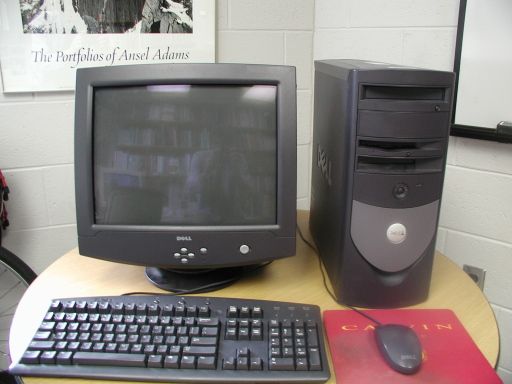
Exercise 1.a.1: Collect your computer components
and configure them as shown in the following pictures. The
first picture shows the front of a basic desktop computer and
the second picture shows the rear of the same computer.
When you are finished, make a note of the following:
- At least 3 basic elements of this computer that are toxic
or environmentally “unfriendly”;
- At least 3 basic elements of this computer that are
recyclable or reusable.
Record your answers so that you can submit them to the course
instructor at the end of the lab period.

Wiping the Hard-Drive (optional)
Data stored on a hard-drive is not completely erased when files
and file systems are deleted. This can be a problem if the disk
stores sensitive or private data. To completely erase a hard-drive
so that no software can recover any of the previous data, one must
use a more powerful disk-wiping utility (e.g., DBAN from www.dban.org).
Exercise 1.a.2: (optional) If necessary, wipe the
hard-drive clean of all previous information. Do this as
follows:
- Insert the disk-wiping utility disk into the CD/DVD drive.
- Restart the machine.
- Follow the instructions.
This process can take some time.
Installing the Operating System
Computing hardware is useless without software. If your
computer does not have an installed operating system (OS), it
won’t be able to do anything until you install one.
Exercise 1.a.3: If necessary, install the operating
system on your machine. Do this in stages as follows:
- Operating System - Install the original,
base operating system by inserting the OS install CD into the
CD/DVD drive, restarting the machine and then following the
instructions.
- Device Drivers - Install any additional
needed device drivers by inserting the service pack CD into
the CD/DVD drive and double-clicking on each device
driver’s executable file and following the
instructions.
- Service Pack(s) - Install upgrades to the
base operating system by inserting the service pack CD into
the CD/DVD drive, double-clicking on the service pack
executable file and following the instructions.
This process can take some time and will require some
intervention and rebooting. Return the OS install disks to us
when you are finished.
Starting the Operating System
When the computer is connected and your OS is installed, you
can start it by turning on the power-strip, the monitor and the
tower. This will cause the computer to automatically
“boot” up the operating system. If you are running
the Microsoft Windows operating system, your workspace will look
something like the following:
It is important to know the characteristics of the system you
are using. Desktop computers tend to have the following basic
hardware and software components:
- Processor - This is the brain of the computer.
It executes all the work that your computer performs.
- Main Memory - This is your computer's
short-term memory. It keeps track of what is going on on
your computer at the moment. If you turn your computer off,
this information is lost.
- Hard Drive - This is your computer's long-term
memory. It stores the documents you are working on and the
programs you are using. This information is kept, even when you
turn off your computer.
- Operating System - This is the program that
controls all the PC system hardware. It performs the
operations that you, the user, request.
Exercise 1.a.4: Start up the operating system and
determine its characteristics by looking through the Windows
“Control Panel” for “System
Properties” information. In Windows XP, you can do this
as follows:
- Right-Click (i.e., click the right mouse button) on “My
Computer” (in the upper left corner of your workspace).
- Choose “Properties”
- Look through the “General” panel to find out the following
basic information on your PC system:
- your current operating system version
- your processor type and speed
- the amount of main memory your system has
- Now, go back and double-click (i.e., rapidly click the right
mouse button twice) on “My Computer” to find out the following
information on your system:
- the size of your hard-drive (by clicking the right mouse
button on “Local Disk (C:)” and choosing “Properties”)
- a list of other storage devices your system supports
(e.g., a CD/DVD drive)
Record your answers so that you can submit them to the course instructor.
The Windows operating system on your machine is a legal
copy.
Checking In
When you are finished with all the exercises, do the
following:
- Collect the answers you’ve recorded and submit them to
the course instructor.
- Demonstrate that you’ve got your system installed
properly.
- Shut down your machine by choosing
“Start”-“Turn Off Computer” and then
“Turn Off”.