Before you begin, you’ll need to know the answers to the following questions:
Your instructor will have to tell you how to access your account and how to start up the X Windows System and desktop environment. Unlike Microsoft Windows and Macintosh operating systems, there are several variations of X11 and many different desktop environments built on top of X11. Generally these desktop environments work on the same principles as Microsoft Windows and Macintosh OSs, so let your intuition guide you.
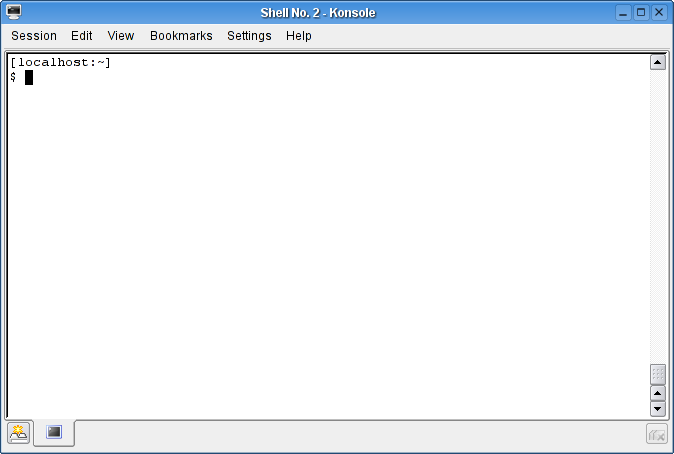
Regardless of what GUI you use on your UNIX machine, you can always interact with UNIX directly with a Command-Line Interface (CLI). Eventually, your instructor should tell you how to open a terminal window (a.k.a., an xterm or a console window). It will look something like this:
As pictured in this example, I use a two-line prompt:
[localhost:~]
$
A UNIX prompt is highly flexible. Yours is probably very simple. The purpose of the UNIX prompt is to prompt you for a command. If you don’t see a prompt, the terminal window is busy working on something else.
For this lab manual, we will use unix-% as a generic UNIX prompt. You
don’t need to type in the UNIX prompt yourself. That’s the prompt from UNIX; you must
enter in the command that you see after the unix-% prompt.
UNIX interaction consists of three steps which are repeated until you close the terminal window:
The UNIX environment is case-sensitive, and virtually all UNIX commands use lower-case letters. This will cause you a great deal of frustration if you forget it, so keep this in mind.
In order to use a command-line environment, you must learn those commands that the environment understands. Let’s first see what happens if you type something that the environment does not recognize.
Remember, you don’t enter the unix prompt (“unix-%qwerty
unix-%”).This is the way that UNIX responds when you give it a command it doesn’t understand.
You will create dozens of files as you go through this lab manual, and it’s best to keep them organized separately from the other work that you do. Just as the documents (i.e., files) in a filing cabinet are often kept in manila folders, we can create a container in which to keep related files, called a directory (or a folder).
unix-%mkdir computing
After you type in the command, you should get the prompt back. If something goes wrong, then you’ll get an error message. But no message means that something was done successfully.
The mkdir command is the UNIX command to make
a directory. By placing the word computing after the mkdir
command, you tell the system that you want to make a (sub-)directory named computing.
mkdir command to make a directory in the computing
directory named computing/practice.The slash / character in these directory names is very important because
you’re creating directories within a directory. This allows you to keep the files for this
course separate from other files you might need.
The mkdir gives no feedback unless something goes wrong. So how do we know it
did anything?
unix-%ls
The ls command displays a listing of the
contents of a directory. If all is well, you’ll see at least the computing directory.
You’ll undoubtedly see other directories and files, but the specifics differ in each type of
UNIX.
But where are those other directories you created? They’re inside the computing
directory. The ls command can also be used to find out what is in a particular
directory.
unix-%ls computing
If you follow the ls command with the name of a directory, it displays that
contents of that directory. Now you can see the (sub-)directory that you created before.
To get a more detailed listing of the current directory, enter
Theunix-%ls -l
-l
is called a
switch
or
flag
that causes the
ls
command to generate a long (i.e., detailed) listing. The hyphen indicates to
ls
that the
l
has a special meaning; it’s
not
the name of a directory or file. All UNIX commands have flags like this.
When you begin a computing session, UNIX always starts you out in your home directory. You do not have to remain in your home directory; you can change to a different directory whenever you like.
The directory in which you are working at any particular time is called your working
directory. To find out the name of the working directory, you can use the pwd (print
working directory) command:
unix-%pwd
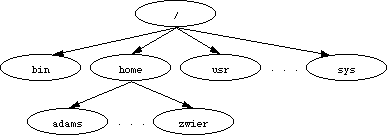
UNIX systems (like all modern operating systems) utilize what is called a hierarchical
directory system, meaning that directories can contain other directories. There is one root
directory denoted by / (a single forward slash) which is the top directory; all
other directories are directly or indirectly inside this root directory.
unix-%ls /
This lists the contents of the root directory. Within / are a number of
subdirectories, including usr, bin, include, and home.
Each of these contain other directories and files. On many UNIX systems, the home directories of the
users are stored within the home directory. Here is what this might look like on a
particular machine:
UNIX treats the tilde character (~) as an abbreviation for your home directory,
which can save you a lot of typing if the path to your home directory has lots of characters.
If you created all of your files in your home directory, it would soon become cluttered. By grouping related files within a directory, you can organize your files.
Since you are working on a lab exercise for this course, let’s change the working directory to the appropriate directory.
unix-%cd computing
The cd command is the change directory command
that changes the working directory to the specified directory. Similar to the mkdir
command, cd will not display anything if it works successfully (although you might
notice a change in your prompt). You will see an error message if something fails.
unix-%cd practice
Use the pwd command to see if you’re where you think you should be.
So the cd command allows you to navigate down a directory hierarchy. What about
going back up the hierarchy?
unix-%ls -a
The -a switch tells ls to list all of the contents of a directory,
including files and directories whose names start with a period (.).
You will notice two odd items in this output: a period . and a double-period ...
In the UNIX file system, . is another name for the working directory (whatever
directory you are in); and .. is another name for the parent directory
of (i.e., the directory above) the working directory.
You created computing within your home directory. The cd computing
command took you from your home directory “down” into computing. Once in
that directory, . refers to that same directory while .. refers to the
directory that contains it (i.e., your home directory). The cd practice command took
you one level lower into the practice directory. Now that you’re in the practice
directory, its . entry refers to itself, and its .. refers to the computing
directory.
So now, to go back “up” a directory, you can enter this command:
unix-%cd ..
Since .. is always a synonym for the parent of the working directory, regardless
of any actual names, you can always use this command in any directory.
There’s also a shortcut for changing directories back to your home directory: use the cd
command without any arguments:
unix-%cd
Use pwd to verify that you are currently in your home directory.
UNIX provides commands for copying files or directories from one directory to another. The easiest way to do this is to cd into the directory that contains the files, and then execute the following command:
unix-%cp filename targetdirectory
This copy command will copy a single file to the specified target directory. To move an entire directory and all its descendants, you can use the -r switch:
unix-%cp -r directoryname targetdirectory
This command copies the directory file and recursively copies all of its contents.
UNIX stores all data in files. It stores textual data and programs in text files.
You can create a simple text file using a standard editor (e.g., VI or emacs) or using the
Processing IDE. The Processing IDE saves its sketches by creating a sub-directory and storing its
files as simple text files with a .pde extension in that sub-directory. You will not be
able to compile and run simple text files because they aren’t Processing programs, but the
grader will be able to read them.
computing/practice sub-directory you created above under the name
HelloText. Processing creates a sub-directory named HelloText that
contains a file called HelloText.pde.It is sometimes useful to view the contents of a file (without printing it or loading it into your IDE). For example, this can be useful to verify that the files you’ve submitted electronically were submitted properly. When you do need to view the contents of a file, use the following command:
unix-%cat filename
As with the print command, use this command only for program code or simple text files.
cd
into the directory that contains the file (i.e., computing/practice/HelloText) and then
use the cat command.Occasionally, you will need to print a paper copy of a file. This should be rather rare given that you’ll generally be submitting your work electronically. When you do need to print a file, use the following command:
unix-%lpr filename
Use the command only for program code or simple text files. Never use it for binary files or java class files.
Your operating system may support screendumps using the PrintScreen and alt-PrintScreen keys. Otherwise, you can find an appropriate screen dump program in the start menu or call it from the command-line. Its interface should be relatively simple to use and it should allow you to save your image in a variety of formats, e.g., PNG, JPG, GIF.
practice.png inside the HelloText directory that Processing created
for you.You can use the rmdir command to remove a
directory just like you’d use mkdir to make a directory.
Whatever directory you specify following the rmdir command will be removed from
the file system, provided that the directory being removed is empty. To remove a non-empty directory
named directoryName, use this command:
unix-% rm -r directoryName
Be very careful when you use this command. The system will delete this directory and all its
sub-directories without giving you any feedback, so be sure that directoryName
contains nothing important!
rm -r command to remove the computing directory.Using the ls command, verify that the computing directory (and its
sub-directories) no longer exist.
Here is a quick reference guide for these basic Linux/UNIX commands.