Objectives
Students who complete this lab will demonstrate that they can:
- Design and implement Java GUIs using Swing
- Integrate Processing PApplets into Java graphical user interfaces
|
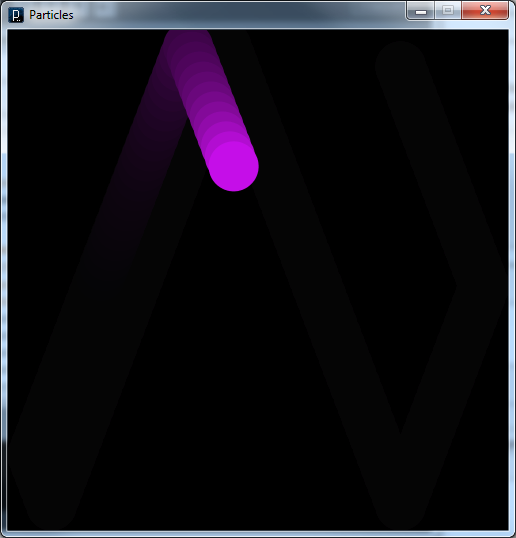
In this lab, you will integrate the following Processing application into the Java GUI framework. Start by
re-familiarizing yourself with Processing applications, focusing in particular on this application: Particles. You can run this program by putting it in a folder named
Particles
and running it using the Processing IDE. The output of this code is as shown to the right.
Take note of the following features of this Processing program:
- Recall the use of
setup() and draw() in the implementation of animated
applications. The “vapor trail” effect following the particle is implemented using semi-transparent
black-wash done at the beginning of each draw() cycle.
- This program implements
drawParticle() and moveParticle() methods that manage a
single particle. This is not strictly necessary for a single particle, but it will be convenient for system
refactoring later in the lab.
- Recall that Processing applications are not explicitly defined using classes. In the past, Processing did
this work for us. In this lab, we’ll build the classes ourselves.
|
 |
Java GUIs and Processing Applications
Java GUI applications can be implemented using the Java Foundation Classes (JFC).
The exercises in this lab tend to require detailed implementation and configuration. Use the examples from the
text and the lectures as guides.
Exercise 11.1
|
Create an appropriate package for lab 11 and build a new class named
ParticleController
that implements an empty, JFrame-based Java GUI application. The output should look something like the image shown
on the right.
Use the following algorithm:
- Default constructor:
- Set the title of the frame to “Particle Collider” using
setTitle().
- Cause the program to exit when the red “X” in the upper corner is clicked.
- Set the size of the window to be 500 pixel wide and 600 pixels high.
- Main method:
- Declare and initialize a
ParticleController object.
- Display the board using
setVisible().
This basic GUI code can largely be copied from application to another. See the text and the lectures for
further examples. Save this code and continue to extend it from one exercise to the next in this lab.
|
 |
Because Processing is Java-based and Processing applications are basically Java widgets, it is possible to
integrate a Processing application within a Java GUI application. You can do this using the procedure outlined in the
text and demonstrated in the lectures.
Exercise 11.2
Integrate the Processing application shown above into your “empty” JFrame GUI as follows:
- Encapsulate the Processing application code in a new Java GUI widget class:
- Create a new class named
ParticlePanel that extends PApplet. You will also need
to add an appropriate import statement.
- Copy the Processing code linked above into this new class, set the visibility of the class elements appropriately
(i.e., public for the constants, private for the instance variables, and public for the
setup() and draw()
methods, and private for the utility methods).
- Add a default constructor and move the instance variable initialization statements from
setup()
to this new constructor.
Note that these steps are basically the steps that the Processing IDE performs on your behalf when it runs your
applications in the Java environment.
- Integrate this new widget class into the empty GUI application you defined in
ParticleController:
- Declare an instance variable of type
ParticlePanel, which you created in the previous
step.
- In the constructor method, initialize your new instance variable using the
ParticlePanel
default constructor, start the Processing mechanism (using init()) and add the new panel object to
the JFrame (using add()).
Run the application in your Java IDE to verify that it runs as it did when it ran in the Processing IDE.
Processing does not provide very useful control widgets for its graphical applications. Java GUIs do.
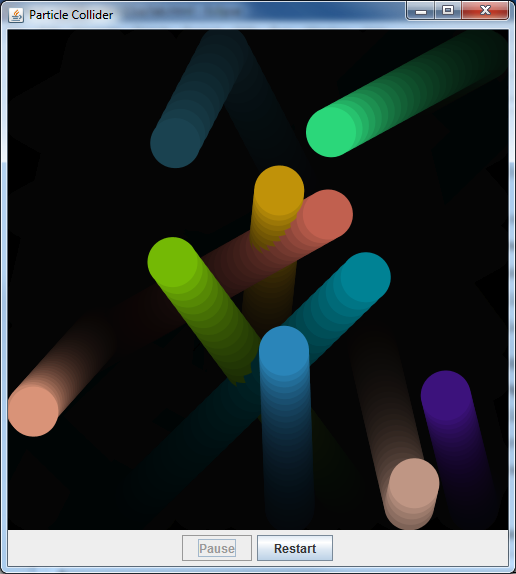
Exercise 11.3
|
Add “Pause” and “Restart” buttons to the interface and program them to pause and
restart the animation. The result should look something like the image shown on the right.
- In your
ParticlePanel class, add a new myRunningStatus instance variable,
initialize it to true in the constructor, use it to enable/disable the animation code in the draw()
method, and add a mutator method that allows a calling program to set it to true or false.
- In your
ParticleController class:
- Add two new instance variables which are
JButton objects (one for pause and one for restart).
- Create a new “control” panel
implemented as a
JPanel.
- Set the layout of your
JPanel to new FlowLayout().
- Initialize the buttons in the constructor method and add them to the control panel.
- Add the panel to the main
JFrame at position BorderLayout.CENTER, and change the
add() for the ParticlePanel to place it at BorderLayout.NORTH.
- Add one inner class for each button to serve as action listeners. The
actionPerformed()
methods in these classes should set the running status of the ParticlePanel appropriately (i.e., false
for pause and true for restart).
- Set the action listener for each button to a new instance of the appropriate inner utility class.
The text and lectures provide detailed examples of how to do this. When finished, run the application to
verify that the new pause and restart functions work properly.
|
 |
For more information on JFC capabilities, see the following two reference sources:
- Swing Components Tutorial
 - This tutorial provides a visual guide to the look and feel of the Swing GUI components and a set of tutorials on
how to use them.
- This tutorial provides a visual guide to the look and feel of the Swing GUI components and a set of tutorials on
how to use them.
- Java API Specification - This is the definitive reference for the application programmers interface (API) to all of
Java’s classes. To use this API reference, you can search for the class you’re interested in (e.g.,
JButton
) in the “All Classes” list and read the documentation on the constructor methods and instance methods
that it provides. This reference is formatted using JavaDoc.
Integrating Additional Graphical Classes
Graphical applications frequently require the use of supplemental, graphical classes. For example, the current
particles application supports a single particle, described by individual instance variables in the
ParticlePanel
class (e.g.,
particleX
and
particleY
) and specialized methods (i.e.,
renderParticle()
and
moveParticle()
). It would be useful to have a separate particle class that encapsulates these attributes and behaviors for a single
particle object. This would allow us to model multiple particles and to model their interactions (e.g., collisions).
In this section, you will build such a class.
Exercise 11.4
Extract the elements required to represent and model particle objects from the
ParticlePanel
into their own
Particle
class. Do this as follows:
- Create a new
Particle class.
- Move (that is, cut and paste, not copy and paste) the following elements from the
ParticlePanel class into the new
Particle class:
- the x & y coordinates, diameter, x & y velocities and color of the particle
- the
drawParticle() and moveParticle() methods - Rename these methods as
appropriate for inclusion in the Particle class, e.g., as render() and move().
- Modify
render() to receive a PApplet from the calling program and use this
object to perform the Processing-specific methods in the definition.
- Add default and explicit-value constructors. The default
constructor should choose literal values for each of the instance
variables (i.e. do not use random), and the explicit value
constructor should receive a value for each instance variable.
- Add accessors for the x & y coordinates and the diameter.
- Modify
ParticlePanel to:
- declare a
Particle object as an instance variable
- initialize this new object in its constructor method using the same random values that were used in the
previous implementation. Note: You will need to declare a defaultDiameter to use
- call the
Particle class’s move() and render() methods in the
draw() method (using move(SIZE, SIZE) and render(this) respectively).
The text and lectures discuss the use of this, an identifier that refers to the current object, in
this case the ParticlePanel object. This so-called “magic pen” allows the Particle
object’s render() to draw on the panel's sketch canvas.
- Note:
ParticlePanel should keep the following:
- constants for its canvas size and the default diameter of the particles it creates.
- the instance variable for its running status (because the running status is part of the panel/canvas, not
the individual particle objects).
Rerun the application to verify that it still behaves in the same way as it did before extracting the
Particle
class.
The previous exercise gives another example of refactoring; that is, re-implementing an application in an
alternate way that produces the same behavior. The goal of refactoring is either to improve the efficiency or
understandability of the code or to prepare for future development.
Now that you have a particle class, it is much easier to modify the particles application to support multiple
particles.
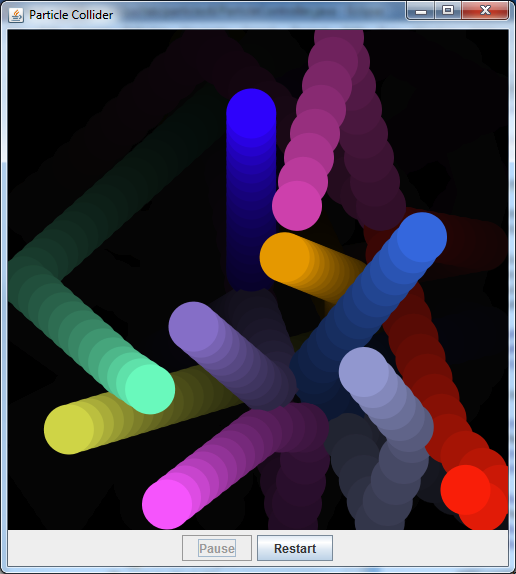
Exercise 11.5
|
Modify the
ParticlePanel
to model multiple (non-interacting) particles as shown in the image to the right. Note that there are multiple
particles and that they pass through each other without colliding. Implement this behavior as follows:
- Change the instance variable for
myParticle to be an array of Particle objects, myParticles.
- Create a new method
createParticles() that implements the following algorithm:
Set myParticles = a new array of default size (say 10).- For
i counting through each element of myParticles:
- Set
myParticles[i] to a new Particle object with random
settings (see the current initialization command for the appropriate arguments).
Replace the current initialization of myParticle in the constructor with a call to this new
method.
- Modify the
draw() method to process all the particles using the following algorithm:
- For
i counting through each element of myParticles:
- Ask
particle[i] to move itself (using move(SIZE, SIZE)).
- Ask
particle[i] to render itself (using render(this)).
Notice how much simpler the ParticlePanel is now that it doesn’t need to manage the internal
complexity of the Particle objects.
Note here that the
Particle
and
ParticleController
classes remain the same. The number of particles, at this point at least, is under the purview of the panel class
alone.
|
 |
Now we’d like to modify the particles to interact with one another by bouncing off one another. This requires
that you change both the
Particle
class, whose objects will need to know when they are “hitting” other objects, and the
ParticlePanel
, which must ask each particle that is hitting another particle to “bounce” off of that particle.
(Extra Credit) Exercise 11.6
|
Modify the application to model colliding particles, as shown to the right. Do this by making the following
modifications:
- Add the following code (a constant and three methods) to the
Particle class: collision code. This code implements collision detection and bouncing behavior; read
through the documentation to get an idea of how it works.
- Modify the
draw() algorithm to initiate the bouncing as follows:
- For
i counting through each element of myParticles:
- Ask
particle[i] to move itself (using move(SIZE,
SIZE)).
- Ask
particle[i] to render itself (using render(this)).
- For
j counting through each element of myParticles:
- Ask
particle[i] to bounce itself off of particle[j] (using particle[i].bounce(particle[j])).
This new step 1.c bounces the current ball off of each of the other balls. If there is no overlap, the call to
bounce() does nothing.
Your application should now implement multiple, interacting particles.
|
 |
Checking In
Submit the final version of your particle collider; the intermediate steps along the way are not required. We
will grade this exercise according to the following criteria:
- Correctness:
- 25% -
ParticleController - This class should construct the interface shown above and implement
its behavior as specified.
- 25% -
ParticlePanel - This class should faithfully copy the behavior of the original
Processing application.
- 25% -
Particle - This class should encapsulate the required particle attributes and behaviors.
- Understandability:
- 5% - Header Documentation - Document the basic purpose, authors and assignment number for your circle
class, console application and unit test class.
- 5% - Code Documentation - Separate the logical blocks of your program with useful comments and white space.
- 5% - Method Documentation - Document the circle class’s methods.
- User experience (UX):
- 10% - GUI Interface - The GUI widgets should work as expected by the users (including the enabling and
disabling of the buttons).
- Extra Credit: up to 10% added to your score