Students who complete this lab will demonstrate that they can:
switch statement in Java
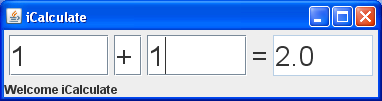
In this lab you will develop the simple, text-based calculator shown below.
As you can see from this design, you must implement four text fields and a text label on the main control panel and one message label. The user will type an operand, operator and operand into the first three text fields, press enter and the system will respond by placing the answer in the fourth text field. Prompts and error messages are placed in the message field.
Start by creating a new package for this lab called
edu/institution/yourUserId/lab7b
. Now, download the starter code and save it to your new package. The starter code can be found
here:
calculator/*.java.
Familiarize yourself with this code, change the package name appropriately and get it to run. Note the following:
Calculator class with its single method calculate() is
only a stub, that is, a non-functional placeholder to be fully defined later.
calculate() method is declared as a static method. See the note below
about static methods.
calculate() always returns 0.
Note on static methods:
The
Calculator
class itself has only one static method that performs basic arithmetic calculations (i.e,
addition, subtraction, multiplication and division). It therefore requires no instance variables,
constructors, accessors or mutators (or if it does,
calculate()
will not use them). You can find more information on the use of static methods (and static data
items) in Chapter 9 under the headings “Static vs. Instance Constants” in Section
9.3.1 and “Static vs. Instance Methods” in Section 9.3.2.
It is often a good idea to start by implementing the unit tests. This approach is called test-driven development. You analyze the problem you‘re solving, specify a list of tests and implement them before actually implementing any of the application features. Then, you implement the application one piece at a time, stopping when your code passes all the tests.
Design and implement 8-10 test cases for your
calculate()
method. Write tests that will check addition, subtraction, multiplication and division. Try to
think of boundary cases and error conditions, and consider whether any exceptions should be
thrown. For example, division by zero should throw an exception, but adding a negative number is
a valid operation. Remember to catch the exceptions that your code is supposed to throw, and pass
or fail the test accordingly.
You should now be able to run your unit tests and they will all fail (unless any of them is supposed to give the answer 0.0!)
Note on invoking static methods:
The static
calculate()
method is similar to Java
Math
library’s static methods
sqrt()
and
pow()
. To invoke these static
Math
library methods, we call them directly off the class, as in
Math.sqrt()
, without declaring an object of type
Math
. Similarly, you do not create an object of type
Calculator
, but, rather, invoke the
calculate()
method as a static method using
Calculator.calculate()
. See the sample code in
CalculatorTest
for an example of this.
The algorithm for the
calculate()
method is as follows:
- Receive two operands (doubles) and an operator (char) from the calling program.
- If the operator is + (addition) (Note, use this syntax:
if (operator == '+')...)else if the operator is - (subtraction)
- Return operand1 + operand2.
else if the operator is * (multiplication)
- Return operand1 - operand2.
else if the operator is / (division)
- Return operand1 * operand2.
else
- Return operand1 / operand2.
- Throw an “illegal operator” exception.
Upgrade the
Calculator
stub class as follows:
calculate() method as specified in the algorithm above.
With this method implemented correctly, your unit tests should all pass. Work with your code until this is the case.
Switch
Statement
The if-then-else statement specified in the algorithm for
calculate()
is not the only way to implement that function. In fact, a
switch
statement is actually a better choice in this case. Thus, we can re-implement the
calculate()
method using a
switch
. This process of re-implementing an application without changing its behavior is called refactoring.
Refactor your
Calculator
class as follows:
calculate() method to use a switch statement
rather than the if-then-else statement specified above.
case clauses, e.g.,
							case  constant1 : case  constant2
							 :  statements
)
Add test cases to exercise these new function codes.
This new version of the method should still pass your unit tests; it’s only the form of implementation that has changed, not the behavior.
This use of unit tests to verify the correctness of refactored code is very useful. It gives you confidence that your new version of the implementation is just as correct as the old version was.
To implement the interactive behavior, add a SINGLE inner class to
CalculatorController
that responds to the user entered event (Remember, each of the fields can use the same action listener object).
The actionPerformed method of this class should implement the following algorithm:
- Declare double variables
operand1andoperand2, and char variableoperator.- Set
operand1= the value inoperand1Field(Note, use this code to parse text in the field:Double.parseDouble(operand1Field.getText())).- Set
operator= the character inoperatorField(Note, use this code to parse the first character in the field:operatorField.getText().charAt(0); this returns achar).- Set
operand2= the value inoperand2Field- Set
result= the calculated value (Note, use this code to compute the result:Calculator.calculate(operand1, operator, operand2);this returns a double).
Set the text ofresultFieldto result value (Note, use this code:resultField.setText(Double.toString(result));)
Add the interactive behavior to the
CalculatorController
by implementing the algorithm give above. When you are finished, the application should give the
correct answer to any valid calculation you request.
Also, add exception-handling code that catches attempts by the user to enter the string
“one” when they should be entering “1” (Note: Double.parseDouble already knows to throw a
NumberFormatException
in this case) deal with invalid operators, and gracefully handle division by zero. In each case, update the
message label to let the user know what went wrong.
This exercise is very similar to the factorial example covered in the lecture.
Add a summation method to your calculator that receives a double n and returns the sum of the
numbers from 0 to n. For example, the summation of 4 is 10 (i.e., 0+1+2+3+4). Use the code
S
(i.e., a capital “S”) in your calculate method, and then call the summation method. The summation method should be implemented using recursion,
and it should throw an
exception for a negative operand. Make it a static method as you did with the
calculate()
method. In your controller, use the first operand field to get the value of n, and accept any
valid number for operand 2 (so the user will be required to enter a value
for the second operand, but it will simply be ignored in the calculate method).
Add test cases to exercise this new function, including the thrown exception. Rerun your GUI controller and your unit tests. Save this version of your code to turn in.
When you build a class, you generally would like to reuse the methods at a later time, and perhaps to advertise them so other programmers can use them as well. To support this, it is a good idea to clearly document the Application Programmer’s Interface (API) to the reusable elements of the class (e.g., the public methods you’ve written). Most development environments provide tools for doing this automatically. Go here to do this in your development environment:
Compare the format of the documentation you produce with the standard Java reference documentation; as you can see that Java produces its documentation using Javadoc as well.
Add appropriately formatted Javadoc comments to your two new classes and generate a Javadoc API reference for your new application.
Submit all the code and supporting files for the exercises in this lab. We will grade this exercise according to the following criteria:
calculate() method should be implemented properly
using switch.