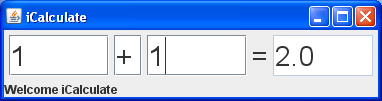
In this lab you will develop the simple, text-based calculator shown below. As you design your application, it is a good idea to think about appropriate test cases during the analysis phase, before you design or implement your system. Then, you can retrieve and run these test cases in order to increase confidence that your design and implementation are correct. Because there are too may test cases to specify them all, it is important that you specify tests exercising the full range of the application’s functions.
Make a short list of test cases that would exercise the calculator shown above. For example, if the calculator is working properly, then one plus one should equal two. Thus, you could add the following test case:
Add 5 to 6 test cases that exercise the limits of the calculator GUI you are designing and save them for use when you have the calculator implemented. For now, you can write them on a sheet of paper; you’ll implement them later.
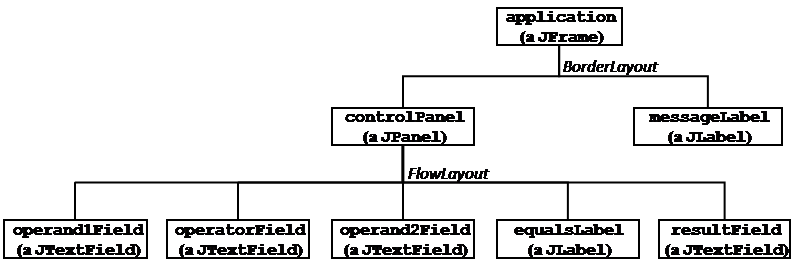
As you can see from the design shown above, you must implement four text fields and a text label on the main control panel, placed on the “North” and one message label, placed on the “South”. Do this using containment properly, as shown in this diagram.
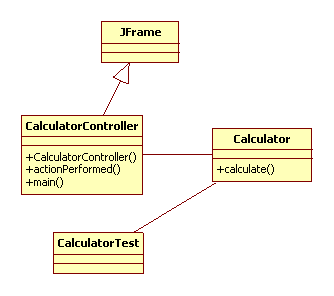
The class structure for your application is as follows.

As you can see, this application has no Processing-based panel. The Calculator
class is purely a computational class that doesn’t inherit from any JFC/Swing class,
doesn’t have any instance data, and uses an empty default constructor. It just calculates.
That is, it is a model and the GUI is the view. Distinguishing the model and view
during the design phase will be important when you get to unit testing. The GUI controller, CalculatorController,
allows the user to enter values for the two operands and the operator, and then press enter to start
the calculation. Here are algorithms for the CalculatorController class.
calculator).Title theJFrameand set the default close operation.
Declare/initialize acontrolPanelthat uses a flow layout manager.
For each of your text fields and labels:
Initialize the field/label;
add()the field/label tocontrolPanelin the appropriate order (Note, usecontrolPanel.add(guiObject));
Add the action listener as you have done in the past.
add()yourcontrolPanelto the main frame on the “North” side;
InitializemessageLabelandadd()it to the main frame on the “South” side;
Initialize yourCalculatorobject (calculator).
actionPerformed()
Receive an ActionEvent object.
Setoperand1= the value inoperand1Field(Note, use this code to parse text in the field:Double.parseDouble(operand1Field.getText())).
Setoperator= the character inoperatorField(Note, use this code to parse the first character in the field:operatorField.getText().charAt(0); this returns achar).
Setoperand2= the value inoperand2Field
Setresult= the calculated value (Note, use this code to compute the result:calculator.calculate(operand1, operator, operand2);this returns a double).
Set the text ofresultFieldto result value (Note, use this code:resultField.setText(Double.toString(result));)
main() method as you have implemented
it on previous GUI applications.The Calculator class itself has one method that performs basic arithmetic
calculations (i.e, addition, subtraction, multiplication and division). Here are algorithms for the
Calculator class.
Calculator has no instance data to declare.calculate()
Receive two operands (doubles) and an operator (char) from the calling program.
If the operator is + (addition) (Note, use this syntax:if (operator == '+')...)
Return operand1 + operand2.
else if the operator is - (subtraction)
Return operand1 - operand2.
else if the operator is * (multiplication)
Return operand1 * operand2.
else if the operator is / (division)
Return operand1 / operand2.
else
Print an error message (usingSystem.out.println()).
Exit the program (usingSystem.exit(-1)).
Return 0.0; (Note, this will never be called but it satisfies a compiler error message.)
Build classes for the Calculator and the CalculatorController as
specified above. Make sure that this application can perform basic operations. Your instructor may provide the basic GUI code for you to start with.
Before moving on, find some ways in which users could break the application with inappropriate input. If you didn’t include test cases for these error conditions in your list of tests above, then add one test case for each error condition now.
Save these classes for use in the next exercise.
The application you’ve developed so far does not handle anomalous user input appropriately. In this section, you add code to raise and handle exceptions properly.
Add code in your Calculator class to throw an exception whenever the user (or
calling program) specifies input that raises any of the following error conditions:
infinity.For the purposes of this lab, throw an Exception object (a checked
exception), rather than the potentially more appropriate IllegalArgumentException (an unchecked
exception). Using checked exceptions requires that calculate() either handle the
exception or specify a throws clause. Use a throws clause for this
exercise.
Save these classes for use in the next exercise. At this point, your controller class will have compilation errors because you haven’t yet handled the thrown exceptions; you will do this in the next exercise.
The methods called in your CalculatorController#actionPerformed() method are
programmed to throw the following exception types:
NumberFormatException - when the user specifies numeric input that cannot be
parsed as a number;StringIndexOutOfBoundsException - when the user leaves the operator text
field empty ;Exception - when your Calculator class throws the errors you
just finished programming.You will need three catch blocks to handle these errors separately. Note that these catch blocks must be ordered as shown here, from most specific to most general (as specified in the Exception class hierarchy).
Add exception handling code to your actionPerformed() method to handle the
exceptions potentially thrown by the method calls it contains. Your GUI should display the error
message in the messageLabel (using this command: messageLabel.setText(someMessageString)). You can do this by moving all your existing code in actionPerformed() into a try block, and then adding catch blocks for each of the exception types listed above.
Save your modified classes to turn in later.
JUnit tests are implemented in a separate class that constructs and exercises a Calculator object
(or Calculator objects). Go through the JUnit tutorial for your IDE:
You can find a complete API reference for all of the JUnit assert commands here: http://junit.org/apidocs/org/junit/Assert.html
You can visualize the class structure of your application with a JUnit test class as follows:
If you took the wise step of specifying appropriate unit test cases during the analysis phase
(see exercise 9.1), you can now implement those test cases without worrying that your tests will
simply “confirm” your design and implementation rather than actually testing them. Note
that you can only specify unit tests on the model class (i.e., Calculator), not on the
view (CalculatorController). For example, you could test your addition calculation
using the following test method:
@Test
public void calculateAdditionTest() {
	Calculator calculator = new Calculator();
	try {
		assertEquals(2.0, calculator.calculate(1, '+', 1), 1e-3);
	} catch (Exception exception) {
		fail("failed calculation unit test...");
	}
}
Create a unit test class for the Calculator class and add test methods for each of the following cases:
calculateAdditionTest());Calculator class - Write a separate test method for
each of the thrown exceptions (i.e., illegalOperatorTest() and divisionByZeroTest()). Note that these test cases are supposed to throw exceptions, so the catch block will be empty.Save this class to turn in later.
Submit all the code and supporting files for the exercises in this lab.